Become a Site Supporter and Never see Ads again!

Author Topic: Finished Project: Building My Monaural Playback System  (Read 17997 times)

0 Members and 1 Guest are viewing this topic.

mfrench

  • Guest
  • Trade Count: (0)
Finished Project: Building My Monaural Playback System
« on: September 10, 2010, 10:32:16 PM »
OK,.... I've wanted a mono playback system for quite a few years. I've tried a couple of times, and met with limited success. I actually have quite an extensive amount of mono and 78's, so this will be a worthy effort.
Towards this effort, I scored a 1957 Harman-Kardon Prelude PC200 10watt integrated mono tube amp on CL. It's in great shape and works perfectly.
I also have a 1953 Presto Recording Corporation 15G2 turntable, and a 1955 GE A1-500 transcription broadcast tonearm, with an NOS GE VRII TriplePlay cartridge from the mid-50's. This is the cartridge that has the red handle on top that you use to turn the needle from LP to 78.
So, I've been accumulating parts for a mono system for a while now, and have all the components. I was just stuck on what to use for a cabinet.


« Last Edit: October 12, 2010, 04:40:19 PM by m0k3 »

mfrench

  • Guest
  • Trade Count: (0)
Re: Building My Monaural Playback System
« Reply #1 on: September 10, 2010, 10:36:09 PM »
What's in the Truck?


Old phonograph and radio cabinet from an era when 78 ruled, and amplification was just being introduced. It seems to be of British descent.

The arm is extremely heavy, labeled as, Harlie. It has a steel phongraph needle from the "victrola/edison" era, that is also an electronic pickup that feeds to an old tube amp.
The turntable is hand cranked. Its very noisy in its bearing and runs at about 68->70rpm
I have no intention of using it with this arm, TT, or the amp. I'm purely after it for the cabinet and will be replacing components with more modern gear.

Hand cranked TT:


Platter, from when they even made the unseen details pretty:

label:

platter off for the first time in??


rear of cabinet and guts:


old integrated amp (radio, and, phono):


spare tubes - Osram (also labeled as British General Electric) and BVA:


Rola speaker:


Motor:


mfrench

  • Guest
  • Trade Count: (0)
Re: Building My Monaural Playback System
« Reply #2 on: September 10, 2010, 10:37:37 PM »
My intention is to gut out the old original stuff, which is really not working - the TT spins, but slowly, and not very long. The amp is dead, and would take a major overhauling effort (that I know nothing of).

I got to tear this thing down this afternoon. I got the amp out, and the speaker out.
The speaker came to life when I touched it to a 1.5v battery. So, I dug in deeper and pulled it out.
Its a nice paper cone, rippled edge. It had a transformer attached to it. When I hooked it up to the HK 10w, I had to turn it it 11 to hear anything. So I took the transformer off, total change, and the thing started making really nice sounds, but sounded stiff, as it had sat for 15 years unplayed by the sellers suggestion.
Its been playing for a couple of hours as a mini open baffle leaning against my stereo rack, and it sounds really nice - its a keeper.  There is a slight tear in one area, but I was able to massage things back together fairly well, and its inaudible.
Suggestions for gluing this together?
The tear is directly behind one of the frame supports making it a bit difficult to access. I think a rear repair would be better, and I can reach it with some effort. Overall its a really nice sounding speaker.
There is no dust cap.
« Last Edit: September 10, 2010, 11:04:56 PM by m0k3 »

mfrench

  • Guest
  • Trade Count: (0)
Re: Building My Monaural Playback System
« Reply #3 on: September 10, 2010, 10:38:03 PM »
When I took the speaker out today, it allowed me to remove the old stained speaker fabric. I replaced it with a reed place mat / grass cloth. It didn't effect the quality of playback and looks WAY better than that urine stained(?) fabric. There was quite a bit of cat hair inside the cabinet,  and kibble snacks of some kind.

So, I used the old original speaker wire, and soldered it back to the speaker leads, along with some heat wrap to keep things tight.
So the speaker is wired with old vintage cloth wrapped wire; steel wire?
The cabinet is a resonant design. Half of the floor of the interior, immediately below the speaker, is open to the floor, and the rear is also open and fires into the corner.
The thing has some fairly massive bass response with the little speaker!

at any rate,.....
we ordered a new couch last week - so, forgive the ugly old leather thing - its 12+ years old and is my sweet spot for the stereo system listening, and well worn. We're also readying for a paint job amidst all of this.
This mono system sort of fires back towards my stereo rack. And being a mono corner speaker it fills the whole room w/ music, in a nice blending without so much of a source influence - its just a room with music in it.

This is essentially what I have in my mind, but far from being finished (below pics). I just need to find a new facade material for surrounding the amp, and making it blend in naturally. I'm thinking perforated copper screen, or perhaps something like acrylic tortiseshell if I can find it;  and cut it to a tightly scribed finish around the H-K amp.
For now, its making wonderful mono music in the corner, and sounding damn vintage and appropriate.
And,... Sarge has totally changed her tune - SHE LOVES IT!!
After todays tear down and gutting session,....


Note:
Since the pics, I've moved the TT to the cabinet top to test for acoustic anomalies, feedback hum etc., and it passing the test thus far.
« Last Edit: September 10, 2010, 11:17:22 PM by m0k3 »

mfrench

  • Guest
  • Trade Count: (0)
Re: Building My Monaural Playback System
« Reply #4 on: September 10, 2010, 11:27:31 PM »
the vintage components:
This is the deck that i'm going to use; a Presto Recording Corp. 15G2, from 1953. Its a three speed idler drive that I've been restoring, and have working perfectly now, complete with a newly retread idler wheel.


This is the GE A1-500 arm for it, from 1955, possibly earlier (it was on my 1955 Presto T18 turntable):


Harman-Kardon Prelude integrated 10w mono tube amp, c. 1957

Offline mike1061

  • Trade Count: (0)
  • Taperssection Member
  • ***
  • Posts: 911
Re: Building My Monaural Playback System
« Reply #5 on: September 11, 2010, 05:40:21 PM »
So you weren't happy with the sound of the other TT, with the mono arm added?
Thanks Mike

mfrench

  • Guest
  • Trade Count: (0)
Re: Building My Monaural Playback System
« Reply #6 on: September 11, 2010, 05:51:55 PM »
Which arm, Mike, the original arm?
If so, it weighs about a pound at the needle, tracking force, and will cut records to ribbons. Some of the old shellacs had a series of check boxes on the labels, for around 50 plays, before they were dead, due to those hayfork tine needles.
The more modern arm that I'm going to mount will allow for 4 grams of tracking, compared to the literal 16oz of tracking force from the other arm. The 4 gram GE VRII will not damage the records.
And I want to play 33 mono. The original table only spun at 78 (actually clocked at 68 at full windup), and its bearing / gearing system is really, really noisy.
So, a new deck will add versatility with the other two speeds.
I've been spinning Chet Atkins, Johhny Cash, Buck Owens, Doris Day, Kay Starr, Guy Lombardo, and a bunch of Big Band stuff at 33, and it sounds so nice presented in a vintage format.

Offline it-goes-to-eleven

  • Trade Count: (58)
  • Needs to get out more...
  • *****
  • Posts: 6696
Re: Building My Monaural Playback System
« Reply #7 on: September 11, 2010, 06:16:36 PM »
That is gorgeous!

I have an old one I've been saving (I think it is an rca). Or, rather, am keeping at my folks'.  It has a turntable and shortwave.   For now, it is just being used as an end table.  I understand demand isn't that great for them, so they aren't worth much.   I hate to gut it..   The shortwave works, so I'd like to keep that.    Some day..


mfrench

  • Guest
  • Trade Count: (0)
Re: Building My Monaural Playback System
« Reply #8 on: September 11, 2010, 07:08:13 PM »
I hear you on not wanting to damage the original parts. i was looking for a gutted project cabinet so that I didn't have to do that; but this thing sang its siren song to me,....
The amp is so far gone and toasted that it would be a complete overhaul from scratch. Tons of wires with insulation that has fallen off. The amp and TT were so far gone that I don't feel so bad about gutting it. The TT might be a worthy package for someone who wants an early amplified TT, as it spins up, and might just need a refreshing. Bu at present,.... really noisy.

What I'm going to do in this is replicate the originals, with modern parts that will look correct, and fit the exact dimensions of the originals, so that it can be reassembled to original. I don;t sell my builds, so I doubt its going anywhere for a while.

I have a friend who is a vintage tube guy, and up til recently, has worked in the radio broadcast biz as a trouble shooter, engineer.. He's an electrical engn'r by training, and knows tubes like the back of his hand.
I might have him take a look at it, and see if it can be restored. Its a complex bit of wiring below the hood though, and would be a massive dig to get anything done. I know nothing of tubes, so I'm out.

Offline Gutbucket

  • record > listen > revise technique
  • Trade Count: (16)
  • Needs to get out more...
  • *****
  • Posts: 15734
  • Gender: Male
  • "Better to love music than respect it" ~Stravinsky
Re: Building My Monaural Playback System
« Reply #9 on: September 11, 2010, 09:27:52 PM »
Sweet cabinet. I'm intrigued by the part-mechanical / part-electric nature of the original player. Cool iron platter casting.  So it was a wind-up mechanically driven platter, with electric amplification and the output transformer mounted directy on the speaker.  Is there some sort of coil mechnism cartidge inside the head of the TT arm which the steel needle fits into?

I was just thinking of you a couple weeks back when I was up in NC at a country blackberry festival in an old CCC era stone school with some old-time music performers playing and a junk sale with loads of old 78's.  I was tempted to bring a load home, but realized I'd probably never get around to doing something with them.

What does the contol labled contour on the Harmon Kardon do?
musical volition > vibrations > voltages > numeric values > voltages > vibrations> virtual teleportation time-machine experience
Better recording made easy - >>Improved PAS table<< | Made excellent- >>click here to download the Oddball Microphone Technique illustrated PDF booklet<< (note: This is a 1st draft, now several years old and in need of revision!  Stay tuned)

mfrench

  • Guest
  • Trade Count: (0)
Re: Building My Monaural Playback System
« Reply #10 on: September 11, 2010, 10:48:20 PM »
Hi Lee,
I'm still learning about it, and had to refer to the manual.
There are several different ways of "shaping" the sound with the amplifier; Rumble Filter, Contour, RollOff, phono-input EQ selectors (3x), and the Bass/Treble EQ setting knobs. I've played with all of them, but unsure as of yet, how to describe the functions.
This is a copy of a manual scan pdf, of the contour information:


Offline Gutbucket

  • record > listen > revise technique
  • Trade Count: (16)
  • Needs to get out more...
  • *****
  • Posts: 15734
  • Gender: Male
  • "Better to love music than respect it" ~Stravinsky
Re: Building My Monaural Playback System
« Reply #11 on: September 12, 2010, 02:52:17 AM »
That's serious tone control.

Seems to have high/low-pass filters, high/low-shelving eq, 'loudness curve' eq, and the 3 phono-input eq's.  I know there were a number of different playback eq curves used in the early electrical recording era- as I understand it each record manufacturer/label used their own curve for years until the eventual RIAA standard.  I'd guess the phono-inut eq's let you switch between 3 of those.  I'm sure you know far more of the details about that than I, though. If there was any question before, there is now no doubt that you are Mr. Record Guy.
musical volition > vibrations > voltages > numeric values > voltages > vibrations> virtual teleportation time-machine experience
Better recording made easy - >>Improved PAS table<< | Made excellent- >>click here to download the Oddball Microphone Technique illustrated PDF booklet<< (note: This is a 1st draft, now several years old and in need of revision!  Stay tuned)

Offline Jimna

  • Zappa for President
  • Trade Count: (3)
  • Needs to get out more...
  • *****
  • Posts: 9639
  • Gender: Male
  • Audio DeutchKraft & Busman Audio
    • F.M.Record Company
Re: Building My Monaural Playback System
« Reply #12 on: September 12, 2010, 03:22:38 AM »
pretty cool, moke.  my mom really digs antiques too.  It was funny as I started reading this because Im pretty sure she has 2 of those (or close facsimile) in her house now....not because she is into vinyl, but because she thinks they look appropriate near modern media(ie TV ::) ) to off set them in the room...she really likes old shit.     

If your going to modernize it this much why not make it sound better too?....yes I realize a mono source is still mono but why not polish that turd a little?
Co-Founder of F.M.Recording 
SD: Busman Audio BSC1-K1/K2/K3/K4 > Grace Lunatec V3 > Busman Hybrid R4
LD: ADK A-51TL MP > Busman Hybrid R4
+ 48 Channel Multi-track rig

Canon 5D Mark II, Canon 2x Extender Mark III, Canon 15mm f2.8, Canon 85mm f/1.8 USM, Canon 100mm Macro f2.8, Canon 16-35mm L f2.8, Canon 24-70mm L f/2.8, Canon 70-200mm L f2.8 IS, Canon ST-E2, Canon 580ex II (x2), Canon 430ex II, PocketWizard PLUS II(x4), Radiopopper PX System

http://jmimna.com/

Information is not knowledge
Knowledge is not wisdom
Wisdom is not truth
Truth is not beauty
Beauty is not love
Love is not music
Music is THE BEST
-FZ

mfrench

  • Guest
  • Trade Count: (0)
Re: Building My Monaural Playback System
« Reply #13 on: September 12, 2010, 09:19:55 AM »
I felt, for the longest time, especially after spending so many years trying to understand stereo recording; i felt/wondered what the heck do these folks see in this older mono stuff?
About a year and a half ago, i started hanging at an old record player restorers site. There were some guys there that were putting some serious time and serious bling into mono systems.
I've listened to mono now for a year and a half, in stereo.  The signal was mono, but it was processed by stereo gear and going out to a stereo pair.
While it sounded fine, it was an odd, not really right sound, but hard to describe the not-rightness.

A couple of weeks ago, I found that HK amp for a steal on CL. So I bought it.  I ran it into a single David Bogen Corp full range mono 12" speaker. The speaker I used came from one of those old suitcase record players that they used to use in schools and used in square dancing.
At any rate, the spkr came in its own open baffle-type cabinet, so I pushed it into a corner. Traditional mono speakers were frequently placed into corners to increase bass response, and broadcast into the room in a diffuse seeding of music. The sound that speaker made from the corner was really cool. It completely filled the room up with sound, and was fairly indistinguishable as to where it was coming from; but the whole room was alive in music, and sounded nice regardless of where you were. The stereo does this too, obviously, but, is best enjoyed in one 2sq.ft square spot in the room - beyond that sweet spot and it might as well be mono.
As far as frequency spectrum goes in playback with the cabinet speaker,....
it will carry a cello very well. It gets a bit bloated in the string bass notes, but thats a cabinet issue that I'm going to address with some cabinet tuning to increase projection a bit, and reduce the bass blossoming of a resonant cabinet design. Resonant cabinets are making a significant comeback in stereo playback these days, as people are moving away from high wattage amps, and going for micro-wattage, literally .75w amps. They like the old style cabinets because they are only using a single driver spkr, without any crossovers, and allows for insane sensitivity for those micro-wattage amps..
The cabinet increases the bass response, naturally, and gives a nice fat tone.
This old cabinet is an original resonant cabinet design that todays cutting edge speaker manufacturers are touting as modern. It really does make some nice sound. But I know I can shape it a bit with some internal bracing that would cause the side walls to flex a little less, reducing bloat. There are also two "ports" that can allow me to tune the amount of sound coming out the rear of the cabinet, and one that redirects it towards the floor. In this effort, I found that when I placed a piece of 1" neoprene foam kneeling pad within the spkr cabinet, and leaned it diagonally behind the speaker, I was able to sharply reduce the corner bass response and make it more articulate by directing it down and out the bottom of the cabinet (both the rear and floor are "ported"). So I'm going to create a tunable internal diagonal baffle that can be set to different angles to change the amount of rearward projection.
I'd love to have something like an old Quad ESL speaker (looks like the rear seat of a 47 packard), or some Klipsch corner horns, Altec Lansings, but it takes more room than I have - they're truly massive spkrs. When we get the larger house (and Sarge is looking), I'll have my dedicated listening area, and will have a glorious large scale mono system - but they are not small, make no mistake. For now, this small console fits our house and Sarge loves it.
« Last Edit: September 12, 2010, 11:26:25 AM by m0k3 »

mfrench

  • Guest
  • Trade Count: (0)
Re: Building My Monaural Playback System
« Reply #14 on: September 12, 2010, 09:38:32 AM »
Sweet cabinet. I'm intrigued by the part-mechanical / part-electric nature of the original player. Cool iron platter casting.  So it was a wind-up mechanically driven platter, with electric amplification and the output transformer mounted directy on the speaker.  Is there some sort of coil mechnism cartidge inside the head of the TT arm which the steel needle fits into?


The pickup head is traditional in its size and weight. Its really heavy.
The arm is bakelite, and hollow out to the head. The head has some sort of processor in it that takes the needle motion and converts it to electrical signal.
I have not hooked it up, but, I did put a DMM on it, and found that I can create a DC voltage load by tweaking the needle sharply. So it seems to still work.
It is wired to a 1/4" audio plug. That audio plug went directly to the integrated tube amp, in a traditional connection. The radio is also built directly onto the amp, literally an early integrated amp.
Just last night I found that the pickup head rotates around about 90ยบ, assuming to get the needle to clear the record, or for needle changing. It also seems to disconnect the pickup, for what I assume to be feedback resistance in radio listening.
This is one of the earliest examples of an electronic pickup and electronic amplified audio systems. Its components are just totally dead, and I don't have the interest, nor funding, to throw at restoring the old amp - I can see that easily going over a grand.
As I do with all of my renovations, its all being done so that it can be brought back to original. I will box and save the old amp and TT, just in case I hit the lotto and can afford to OH it.

edit; to finish my thought,.....
You'd asked about the transformer as part of your thought.
The transformer is there, for what I assume to have been an attenuator for the speaker. When I first hooked it up to the amp, I had to go to 11 on the suck knob to hear anything at all.
When I removed the transformer, the speaker jumped to life. It had been silent for 15 or 20 years that this seller had owned it. So it sounded really stiff at first. Since then its loosened up considerably, mellowed, and is a really nice sounding speaker.
So, I'm guessing that the amp was too much for the speaker and it had to be attenuated via the transformer.
The speaker is really sensitive. I can tell that 10w is giving it plenty of a workout. Its a nice match of plenty of power to drive it, and nice detail at low levels.

Paper speakers are said to take a good 25 years to loosen up entirely. So if the voice coil is still loose, they'll last forever, if not abused. There is no foam surround, just paper.
A couple of mono enthusiasts have suggested that I give the cones a treatment of Franklins Tightbond II wood glue. Its said to be a major improvement in the woofiness of the bass.
There is a slight non-distorting tear in the speaker. They said to get a cigarette paper, and tack it to the speaker and then glue-paint the cone, and leave the surround uncoated.
I'll take these guys advice, as they actually grew up with the old vintage gear and have an encyclopedic mental database on the stuff.
« Last Edit: September 12, 2010, 12:52:40 PM by m0k3 »

mfrench

  • Guest
  • Trade Count: (0)
Re: Building My Monaural Playback System
« Reply #15 on: September 12, 2010, 09:17:54 PM »
Lee,

I did some researching today trying to figure this tonearm pickup out.  Its an electronic coil pickup for steel needles phonographs and early amplifiers, from Britain - we know that for sure. Its "headshell" rotates upward for needle changing.
I knew nothing about it, except that it was a really early electronic pickup, and what i've gleaned from a website that I tracked down. I searched the web - not much out there, but I did find this site:
http://www.normanfield.com/pickups.htm
Mine is discussed in topic #5 & #6 on this page^


Its said to be early 30's, and is of bakelite and in good shape. It put out a signal to my DMM, but I have not tried it for a real run yet. And I will!!... But I have to figure out an adaptor as I don't want to cut off the OE 1/4" plug. I have an old TRS connect around here somewhere that I can sacrifice for the effort.
It seems like a bit of a rare find, and is certainly early playback electronics. There is very little information out there on it.  I think its pretty cool bit of audio-deco from the art deco period.
« Last Edit: September 12, 2010, 09:20:12 PM by m0k3 »

Offline mike1061

  • Trade Count: (0)
  • Taperssection Member
  • ***
  • Posts: 911
Re: Building My Monaural Playback System
« Reply #16 on: September 12, 2010, 10:21:39 PM »
Which arm, Mike, the original arm?

Not the original one. I think I remember you building a TT with 3 tone arms, and I thought one was for mono.
Thanks Mike

mfrench

  • Guest
  • Trade Count: (0)
Re: Building My Monaural Playback System
« Reply #17 on: September 12, 2010, 10:30:57 PM »
That table was a two arm table. Then I got creative and assembled some garage junk, and made a tonearm that I ran from the side of it, as an outboard add-on, third arm.
That deck is still in rotation, and regular use in the main stereo. I took that third arm away, as I'd run out of room for it.
this table:
http://img.photobucket.com/albums/v729/MokePics2/Lenco%20L-75%20Project/IMG_5492JPG-1-1.jpg

This antique console project is dedicated to mono playback across the spectrum of era's of pressed music. If there is enough room, I might just add this antique arm back into this console build, just for old times sake, and a unique conversation piece, and for playing the really trashed shellac on. Time will tell; early ciphering stages still in play.
I've moved towards a thought of using glass tile, trimmed in dark soapstone, as my amplifier infill area. Then putting a lamp inside the cabinet for the warm radio tube glow effect to pass through the glass tile.
« Last Edit: September 12, 2010, 10:33:41 PM by m0k3 »

Offline Gutbucket

  • record > listen > revise technique
  • Trade Count: (16)
  • Needs to get out more...
  • *****
  • Posts: 15734
  • Gender: Male
  • "Better to love music than respect it" ~Stravinsky
Re: Building My Monaural Playback System
« Reply #18 on: September 13, 2010, 04:54:20 PM »
Thanks for the link. I love the old tech. Beautiful things from bygone eras. Pretty amazing to think that this is basically the same as a 'modern' moving coil cartridge that has been highly optimized, miniaturized and has double the mechanical and electrical circuitry for stereo.  This one is conceptually the same but built on a more massive scale with a big horseshoe magnet, coils and half the works.  Technically far more crude, but built to a much higher visual esthetic than most of the pickups (and everything else) to follow in future decades. Cool how the head rotates for steel needle replacement.  Many of those old tables had built-in needle cups near the arm to hold spares.

Side story- There is an uninhabited island South of here in the FL Keys which is now a State Park and is accessible only by boat.  Back in my high-school days we used to sneak out there by canoe, hobie-cat, or simply by wading across the sea-grass flats at low tide to stealth camp overnight.  The reason it was preserved as a park was that 150 years ago or so an eclectic botanist established an outpost and moved his family there, in a venture to grow all manor of super spiky Land of the Lost seeming exotic plants.  Some of them are simply huge thorn bushes, others look like giant oversize aloe and agave succulents that stand several stories tall. His primary goal was to develop 'living fence' impenetrable defenses, but apparently the most interested customer was Tomas Edison, exploring use of some of the huge, super hard and sharp spikes as phonograph needles.  Unfortunately, the entire settlement was wiped out by a Seminole massacre and the idea was abandoned, though many of the plants still grow there to this day.  An exotic tropical needle farm!
musical volition > vibrations > voltages > numeric values > voltages > vibrations> virtual teleportation time-machine experience
Better recording made easy - >>Improved PAS table<< | Made excellent- >>click here to download the Oddball Microphone Technique illustrated PDF booklet<< (note: This is a 1st draft, now several years old and in need of revision!  Stay tuned)

mfrench

  • Guest
  • Trade Count: (0)
Re: Building My Monaural Playback System
« Reply #19 on: September 13, 2010, 05:05:35 PM »
I've heard of agave needles before. Maybe a connection?

I've been thinking about the tt and motor.  I like tinkering, and might look towards at least a lube job for it, if not a slow careful disassembly (spring mechanisms worry me. They can take you out if they come blasting out under pressure).
At any rate,... I might try to clean it up a bit, and get it running. Then mount it in a clear acrylic display case with an output jack, so that it can be plugged into the system to play beat to crap charity shop 78's
To me, watching the mechanisms is far more intriguing than the record destruction. I think it would just be cool in a mechanical display box that can be plugged in if desired.

Early country sounds really cool through this thing, natural. Chet Atkins was to die for coming through it.

Offline Gutbucket

  • record > listen > revise technique
  • Trade Count: (16)
  • Needs to get out more...
  • *****
  • Posts: 15734
  • Gender: Male
  • "Better to love music than respect it" ~Stravinsky
Re: Building My Monaural Playback System
« Reply #20 on: September 13, 2010, 05:21:04 PM »
..To me, watching the mechanisms is far more intriguing than the record destruction. I think it would just be cool in a mechanical display box that can be plugged in if desired.

Early country sounds really cool through this thing, natural. Chet Atkins was to die for coming through it.

I hear you on watching the mechanism, maybe a potential cleaner spinner?

I will never forget hearing really old 78's- early country, old blues, Jelly Roll Morton stuff, classical operatic material- played on a friends working fully mechanical machine with integrated horn in the cabinet over 20 years ago.  It blew me away with the quality of the vocal timbre range.

I like the glass tile idea, the escaping glow.. plus glass tile is so Deco it's right in place even when the thing is off.

I'd guess the wood glue stiffens the paper somewhat everywhere except the surround.  It would also increase the mass of the cone somewhat, which lowers the resonant frequency, though Iโ€™m not sure the exact effect that has.  Iโ€™ve heard of tuning bass  woofers with small bits of clay in the dust cap in older designs.  The wood glue coating would certainly fix the rip effectively.


On the transformer-
Hooked to the speaker output of a modern amplifier that transformer acts as an attenuator, but it isn't meant to be, and didnโ€™t serve that function in itโ€™s original implementation.  Instead, it 'transforms' the native high-voltage / low-current output of the tube amplifier to a lower-voltage, higher-current signal that is appropriate for driving the speaker coil. Most audio tube amplifiers have their output transformer built-in to the amplifier chassis, and it has to be there if the amp and speaker arenโ€™t designed together as an inseparable unit (some exotic transformer-less designs excepted).  It is unusual that your cabinet has the transformer built onto the speaker instead, but since this was designed and sold only as an integrated console, it doesnโ€™t really matter where the transformer was mounted.. except that someone working on it could more easily get a nasty shock if they didnโ€™t know what they were doing and electrical standards were a bit more laissez-faire back then.

The reason it acts as an attenuator is that it is transforming the already lower voltage output of your modern amp to a still lower voltage, so the effect is like turning down the volume knob.

The only time similar transformers are attached to dynamic speakers these days is for distributed audio systems where there are many, many speakers connected together but far apart.  Think Musak piped through a department store.  Because the cable runs are so long, installers would need to use expensive low gauge wire which would still have unacceptably high signal losses, or lots of individual amps, so instead they run thin speaker wire and send far lower current but 70V peaks, and transform that down at each speaker (each point of use) to what you would see at a normal audio amplifier speaker terminal.  Westinghouseโ€™s AC power distribution system ultimately won out over Edisonโ€™s DC based power system for the same reason: Efficient power distribution over long distances without as much loss, made possible by transformers that change the voltage/current relationship and step down the high transmission voltage as it get to the point of use.

Electrostatic speakers often have input transformers on them for the opposite reason.  Electrostatic operation requires very high voltage potentials but minimal current, so they use transformers at their inputs wired โ€˜the other wayโ€™ so as to transform the low-voltage but high-current output of the audio amplifier to the several hundred volts that the electrostatic needs to operate.  Years ago, Stax electrostatic headphones shipped with a transformer box so you could use them with any amplifier, not just the dedicated Stax amps.
« Last Edit: September 13, 2010, 05:24:45 PM by Gutbucket »
musical volition > vibrations > voltages > numeric values > voltages > vibrations> virtual teleportation time-machine experience
Better recording made easy - >>Improved PAS table<< | Made excellent- >>click here to download the Oddball Microphone Technique illustrated PDF booklet<< (note: This is a 1st draft, now several years old and in need of revision!  Stay tuned)

mfrench

  • Guest
  • Trade Count: (0)
Re: Building My Monaural Playback System
« Reply #21 on: September 13, 2010, 05:39:22 PM »
WOW!
Thanks, Lee. Electronics are not my specialty. It was striking me as so odd that it had the xformer there. Your explanation went a long way towards answering that!
I should post a pic of the bottom of the amp. Its full of really cool 'stuff" (refers back to lack of electronics knowledge).
You might enjoy that view.  I've gotta reduce it first.

#498 is under-view; #499 is a potentiometer (I'm assuming); 501, external above view
« Last Edit: September 13, 2010, 05:46:05 PM by m0k3 »

Offline Gutbucket

  • record > listen > revise technique
  • Trade Count: (16)
  • Needs to get out more...
  • *****
  • Posts: 15734
  • Gender: Male
  • "Better to love music than respect it" ~Stravinsky
Re: Building My Monaural Playback System
« Reply #22 on: September 13, 2010, 05:58:47 PM »
Neato.

I only know the big picture stuff about the electronics, not the real specifics like some here.  Although it looks like a mess, that thing appears pretty simple, as most old tube gear is.  I see wire wound resistors, transformers, capacitors, old wire, potentiometers.  All standard electronic components, though some of them are 1000x larger than the tiny surface mount device (SMD) equivalents used in suff like our flash recorders today.

Don't plug it in and go poking around!
..or let someone's baby lick it (lead).
musical volition > vibrations > voltages > numeric values > voltages > vibrations> virtual teleportation time-machine experience
Better recording made easy - >>Improved PAS table<< | Made excellent- >>click here to download the Oddball Microphone Technique illustrated PDF booklet<< (note: This is a 1st draft, now several years old and in need of revision!  Stay tuned)

mfrench

  • Guest
  • Trade Count: (0)
Re: Building My Monaural Playback System
« Reply #23 on: September 13, 2010, 06:10:09 PM »
could i fix it with my dremel?

I know to leave that thing far from being plugged in. It sort of scares me; really scares me.
I left it within view of the front window, and Sarge suggested that it might be mistaken for a bomb.

Offline Gutbucket

  • record > listen > revise technique
  • Trade Count: (16)
  • Needs to get out more...
  • *****
  • Posts: 15734
  • Gender: Male
  • "Better to love music than respect it" ~Stravinsky
Re: Building My Monaural Playback System
« Reply #24 on: September 13, 2010, 07:22:31 PM »
I think you can fix anything with a dremel.. as long as you keep an open ended concept of 'fixed'.

You got me thinking about all this stuff, thanks, I like thinking about this stuff..

On resonant cabinet speaker designs-
Resonance is simply stored energy. Resonant energy can be stored in a vibrating cabinet, driver parts, other components, or in air moving in and out of the cabinet itself.  Most of those resonances are bad in reproduction terms, and much engineering has gone into finding and eliminating or hiding them.  Of course some will point out that cool sounding euphonic resonances in old machines are a specific exception because they impart an attractive โ€˜personalityโ€™ which is a large part of the whole attraction of this kind of old gear.  Certainly nothing wrong with that; it's sometimes the entire draw to begin with.

However, resonance can also purposefully introduced for legitimate engineering reasons in an effort to extend the perceived bass response. Any speaker with a port is a resonant design.  Such a speaker extends itโ€™s perceived low frequency range by using the stored energy of the portโ€™s resonance to reinforce itโ€™s output in the region where the speaker would be rolling-off itโ€™s output if mounted in a โ€˜rigidโ€™, sealed box.  Using a port is a design choice to trade a slightly deeper usable response for a steeper roll-off slope and less time accuracy (since it takes time for the energy to be stored and released).  Itโ€™s mostly popular as a way of either getting a bit deeper bass output from a smaller enclosure, or simply more low frequency output than a speaker could normally make in a smaller enclosure.  In that sense, almost all speakers today are resonant designs.  Itโ€™s not money for nothing, the speaker must be making usable output down there already, and as noted there are design tradeoffs in reduced time accuracy and potential problems with crossover integration to other speakers. I sort of have a soft spot for sealed speakers which arenโ€™t outdated tech as much as they are currently out of style.  My current speakers have have holes in them (ports) though and they like to drink a decent amount of juice.

Some of those very efficient speakers are fantastic and highly dynamic, but they usually need to be pretty large, and often use horns, to achieve that high efficiency along with a wide frequency range. 

Anyway just talking shop. Play around with the bracing, the baffle inside, get it sounding good, but don't worrry about resonant designs because they may be a 'new trend' with speaker designers, not that you were anyway.
musical volition > vibrations > voltages > numeric values > voltages > vibrations> virtual teleportation time-machine experience
Better recording made easy - >>Improved PAS table<< | Made excellent- >>click here to download the Oddball Microphone Technique illustrated PDF booklet<< (note: This is a 1st draft, now several years old and in need of revision!  Stay tuned)

Offline Gutbucket

  • record > listen > revise technique
  • Trade Count: (16)
  • Needs to get out more...
  • *****
  • Posts: 15734
  • Gender: Male
  • "Better to love music than respect it" ~Stravinsky
Re: Building My Monaural Playback System
« Reply #25 on: September 13, 2010, 07:42:22 PM »
I know what you mean about mono sometimes sounding odd, sort of stereoized, over two speakers.  I'm reading Geoff Emerick's book on recording the Beatles (their primary engineer at EMI's Abbey Road facility) and I keep refering to the stereo and mono re-releases that came out a few years back to listen for the stuff he mentions.  He puts far more emphasis on all the mono releases, which they all worked long and hard at, than the quick slapdash stereo versions which no one spent much time on.  Comparing the re-releases isn't really fair, since the stereo ones have been re-mastered quite well and are vastly improved by it in my opinion, but I finally started listening to the mono versions on one speaker and that made a big difference (as do headphones).

In a similar vein, I always chuckle when people say that spaced mono stereo recordings aren't very mono compatible because of phase combing.  Well sure, that's what happens if you mix the two channels together, but unless that is being done automatically like in an old TV or something, why mix them when you already have two omnidirectional mono recordings, made simultaneously, a few feet apart from each other?

[edit- appologies for the misspelled surname Mr Emerick]
« Last Edit: September 14, 2010, 11:39:28 AM by Gutbucket »
musical volition > vibrations > voltages > numeric values > voltages > vibrations> virtual teleportation time-machine experience
Better recording made easy - >>Improved PAS table<< | Made excellent- >>click here to download the Oddball Microphone Technique illustrated PDF booklet<< (note: This is a 1st draft, now several years old and in need of revision!  Stay tuned)

mfrench

  • Guest
  • Trade Count: (0)
Re: Building My Monaural Playback System
« Reply #26 on: September 13, 2010, 09:50:44 PM »
Lee,

I'm going to post about resonant cabinets in the More Watts Isn't Better thread - convoluted thread criss-crossing here!
http://taperssection.com/index.php?topic=139154.msg1801642#new
« Last Edit: September 13, 2010, 10:01:45 PM by m0k3 »

Offline Gutbucket

  • record > listen > revise technique
  • Trade Count: (16)
  • Needs to get out more...
  • *****
  • Posts: 15734
  • Gender: Male
  • "Better to love music than respect it" ~Stravinsky
Re: Building My Monaural Playback System
« Reply #27 on: September 14, 2010, 11:50:13 AM »
Good, my mind was getting cross-posted!

I'll just add here (because it's more about outdated old-tech speakers than anything anyone is doing today) that I found an early 60's Hammond Organ an Leslie speaker a few years ago at a junk shop and brought it home.  The leslie amp looks almost exactly like your old tube thing.  In researching it, I found that the really old speakers in these organs used an electro-magnet instead of a permanent magnet for the speaker driver.  I guess that the magnetic matrials were so poor in the early days that it made more sense to use an electric current through a coil on an iron core to create the speaker magnet, than using a permanet one.  Imagine having to power up the speaker itself, regardless of amp, to get any sound.
musical volition > vibrations > voltages > numeric values > voltages > vibrations> virtual teleportation time-machine experience
Better recording made easy - >>Improved PAS table<< | Made excellent- >>click here to download the Oddball Microphone Technique illustrated PDF booklet<< (note: This is a 1st draft, now several years old and in need of revision!  Stay tuned)

mfrench

  • Guest
  • Trade Count: (0)
Re: Building My Monaural Playback System
« Reply #28 on: September 14, 2010, 01:45:02 PM »
hmmmm,... I have had some thoughts about organs and this amp and speaker pairing. That makes two of us.
My late father-in-law was a master degree'd electrical engn'r from the time of tubes, and was a master at tube design. I wish to god I'd learned from him, but, I didn't.
At any rate,... he had an organ with a Leslie, both mechanical and electronic versions. His organ amp looked very similar to this amp, exception to the radio electronics. I've been struck by this since I first saw it, and agree with you on that (but really know nothing about it technically).

Offline cheshirecat

  • Trade Count: (0)
  • Taperssection All-Star
  • ****
  • Posts: 1210
  • Gender: Male
Re: Building My Monaural Playback System
« Reply #29 on: September 15, 2010, 01:10:53 PM »
It looks like a fairly standard amp that you have there.  What is the tube lineup?  You'll know more once you have that information.

Typically you'll have a power transformer that supplies the audio circuit and bias ciruit through pre-amp tubes then power tubes and finally through an output transformer.

SB2 / Rega P1 > Modified Dynaco PAS2 > Modified Dynaco MK-IV monoblocks> Axiom M22 v2

mfrench

  • Guest
  • Trade Count: (0)
Re: Building My Monaural Playback System
« Reply #30 on: September 23, 2010, 01:29:35 PM »
It looks like a fairly standard amp that you have there.  What is the tube lineup?  You'll know more once you have that information.

Typically you'll have a power transformer that supplies the audio circuit and bias ciruit through pre-amp tubes then power tubes and finally through an output transformer.


thanks!
I've taken pictures of the tubes, and i'll gather the images. I took pics of the tubes in their mounts and then out, looking at the pins.
I've stored the amp in the garage for now. I might get brave at some point and start replacing some of the caps; nothing to be done without supervision though. A friend of mine is about as deeply knowledgeable in tube gear design and repairs. Hes worked for years in the radio biz, as an electrical engn'r, supporting old gear. He's suggested helping me sort it out. Its a fairly low priority for now though.

On the renovation front,....
I'm torn between stained glass and perforated metal. I've found some really nice aluminum patterned screening that is totally appropriate, and I have a nice piece of tortoiseshell stained glass. So still debating here.
I took the speaker out yesterday, and reversed its mounting on the main baffle. It was mounted deeply into the cabinet, on the back of the baffle. So I switched the piece of ply that its mounted to, to the outside of the main mounting board, closer to the outside of the cabinet. I also lined the side walls with "egg-carton" foam, and took a 1" thick kneeling pad, and have created a quasi-horn configuration that curves the inside of the cabinet, reducing parallel surfaces area. So the side walls are baffled  with the foam, and the sound is being curved downward through the cabinet floor vent.
While the speaker was out, I put a coat of Franklins TightBond II wood glue over the cone (not the surround). The cone had a slight tear in it. So I paper mache'd a cigarette paper over the tear, and then coated the rest of the cone with the wood glue. This was at the advice of some very knowledgeable old school monophiles, (tweaking tricks from their prime tweaking days).
Overall, solid improvements. Far less woofiness in the bass. Definitely a more refined and focused sound.

Offline Gutbucket

  • record > listen > revise technique
  • Trade Count: (16)
  • Needs to get out more...
  • *****
  • Posts: 15734
  • Gender: Male
  • "Better to love music than respect it" ~Stravinsky
Re: Building My Monaural Playback System
« Reply #31 on: September 23, 2010, 02:32:25 PM »
Looking forward to some pics once you figure out which way to go for the amp surround.
musical volition > vibrations > voltages > numeric values > voltages > vibrations> virtual teleportation time-machine experience
Better recording made easy - >>Improved PAS table<< | Made excellent- >>click here to download the Oddball Microphone Technique illustrated PDF booklet<< (note: This is a 1st draft, now several years old and in need of revision!  Stay tuned)

mfrench

  • Guest
  • Trade Count: (0)
Re: Building My Monaural Playback System
« Reply #32 on: September 29, 2010, 08:53:42 PM »
Well, she has a name - Audrey.
Her namesake is the flower from Little Shop of Horrors.

She got a face lift.

The new outer facade and amplifier surround are finished, w/ exception to some details that I want to rework..
Added: A perforated aluminum grid that is painted to hammered copper (perforated copper = Unobtanium).
The amp is supported on a shelf from inside. There is also a clear acrylic panel surround to support the grid work from behind, and allow for the trim to be screwed to the facade. So, to remove the new facade and replace it with the old is as easy as a few screws, and its back to original.
The grid is screwed to the back of the art-deco accent trim in about 40 places, and tightly around the perimeter as well, for about 60 attachment points. It does not rattle, even turned up louder than comfortable listening.
I like it. It plays with your minds eye, and morphs into a variety of patternings.

Lucille is lending her suspension on the top of the cabinet while we do seismic testing and resonant feedback isolation:


closer detail:


 ^^, I centered the surround facade in such a way as to have it as well framed as the space allowed.
The amp surround and speaker grill are of the same perforation pattern material.

Natural afternoon light, no flash:


Inside the box - new amp shelf, and behind of facade:

I also added a new dedicated knurled earth phono screw, ^^.

The speaker cabinet:


I took the baffle out, and have reversed the speaker mounting to the opposite side of the baffle - it was mounted on the viewed side previously.
This put the speaker closer to the opening.
I also added new foam insulation tape around the entire baffle to seal it front-to-rear.
I've added some rippled foam to the sides to break up parallel surfaces.

Now for something completely different,.....
I've been farting around with making this a quasi-horn cabinet. To that end, I've taken a large mechanics foam kneeling pad (like 24"x36", guessing), and I've stuffed it into the cabinet to create a snail shape that reduces the cabinet size by at least a third, and assists the sound down through the floor vent.
For some reason the photo is really distorted making things look really out of whack, and out of shape. its not,... all the other pictures were at the same time, and its truly squared up, except the picture distortion:
Quasi-horn, in early testing development:


« Last Edit: September 29, 2010, 08:55:22 PM by m0k3 »

Offline Gutbucket

  • record > listen > revise technique
  • Trade Count: (16)
  • Needs to get out more...
  • *****
  • Posts: 15734
  • Gender: Male
  • "Better to love music than respect it" ~Stravinsky
Re: Building My Monaural Playback System
« Reply #33 on: September 29, 2010, 09:41:36 PM »
Gorgeous!  Looks totally correct, like it came that way, with that amp as an upgraded option, back in the day.

Very nice work, Mike.  Just be sure to keep Audrey well fed with a steady diet of shellac, acetate, and vinyl.
musical volition > vibrations > voltages > numeric values > voltages > vibrations> virtual teleportation time-machine experience
Better recording made easy - >>Improved PAS table<< | Made excellent- >>click here to download the Oddball Microphone Technique illustrated PDF booklet<< (note: This is a 1st draft, now several years old and in need of revision!  Stay tuned)

mfrench

  • Guest
  • Trade Count: (0)
Re: Building My Monaural Playback System
« Reply #34 on: September 29, 2010, 10:22:02 PM »
thanks, Lee. I appreciates it.

Now I can work on mounting the TT and arm. I'm going to have to create a frame and an isolated subframe for the turntable to float on.
I was thinking of a simple shelf, hanging from the interior cabinet framing, and fortifying it to hold a bit of load. Then create a separate TT plinth that will mount the the shelf main frame with a series if superballs between the layers, perhaps some other form rubber or of air balls as the shelf/subframe interface,... maybe springs, but thats a bit more complicated.
At any rate,.... now to the TT mounting. I'm probably going to go with stacked layers of plywood, minimal cutouts, with a copper plate top deck. The TT is hammered copper, the facade is hammered copper,.. so a copper top deck would probably be appropriate.

Presently Spinning: Hoagie Carmichael recordings from the late 20's.
Georgia on my mind.

Django Reinhardt 78 cued,....

Offline it-goes-to-eleven

  • Trade Count: (58)
  • Needs to get out more...
  • *****
  • Posts: 6696
Re: Building My Monaural Playback System
« Reply #35 on: September 30, 2010, 01:57:19 AM »
Totally "m0k3nural"!

mfrench

  • Guest
  • Trade Count: (0)
Re: Building My Monaural Playback System
« Reply #36 on: September 30, 2010, 10:40:59 AM »
m0k3natural   (<- think plenty of fats, byproducts, and synthetics)

Its funny,.. I've posted it here, and in two other forums (LencoHeaven, and, audiokarma).  The reactions have been mostly supportive, except at audiokarma. Its been mostly supportive over there, but, there have also been some strongly voiced opinions that I'm changing the time/space continuum by doing this; tragic. They don't seem to understand that the only changes are easily reverted to original, with a few screws.
The way that I see it:
The youngest component that I'm installing is still two years older than I am. That keeps it in the antique category, and keeps me just one or two steps ahead of that category myself.

Offline it-goes-to-eleven

  • Trade Count: (58)
  • Needs to get out more...
  • *****
  • Posts: 6696
Re: Building My Monaural Playback System
« Reply #37 on: September 30, 2010, 02:19:20 PM »
It's a tough call.  So many old console systems get junked because people don't have the room, they don't work, the fire hazard, they get electric shocks from the gear (seriously!), they don't play those records, etc...    You're keeping the old parts, so I don't see an issue..

I do wonder about record wear with the old gear.  You see those massive tonearms, etc, and can't help but wonder if it is in any way too wearing on the records.    Those old cats who engineered that stuff knew a thing or two about mechanical design, so I'm not sure that is an issue.  It may depend on the old gear being in perfect mechanical condition, and I'm sure it varies with the design...

It might be interesting to have an a/b recording of the original configuration's sound vs. the new config.

mfrench

  • Guest
  • Trade Count: (0)
Re: Building My Monaural Playback System
« Reply #38 on: September 30, 2010, 02:35:29 PM »
I'm going to run a GE VR_II triple play cartridge. Its spec'd at 4grams tracking load. There are quite a few newer carts that fall within that range as well; stanton comes first to mind, ranging from 2.5->5grams (winging it here, but reasonably close to specs). So the vinyl won't get too abused.
The GE arm is rigid and unflexible (vertically) all the way out to the headshell. Its only the headshell weight that add's effective mass to the equation, and the headshell has an adjsutablecounter-weight that ranges from 2grams -> 15grams or so.
In speaking to a couple of old radio DJ's from the era,... they ran 8gram needles in microgrooves for years,without undue wear. To paraphrase them - the smoke, dirt, and grit did more damage than the tracking force.
Some of that old vinyl was really heavy, and by feel, substantially harder than the oil crisis post-releases, which is where substantial changes came in tracking force loads.

I'm still toying around with some ideas. I like the idea of the GE arm, and the cartridge that it was designed for (or vice versa). I'm also thinking about a cherry wood tonearm from www.tonearmaudio.com, but have a request to see if he'll still build them old style without the plastic cart. swap system. The tonearmaudio arms are a shoe-in for their appearance.

mfrench

  • Guest
  • Trade Count: (0)
Re: Building My Monaural Playback System
« Reply #39 on: October 08, 2010, 10:55:15 PM »
the plinth'ing begins,....

I'm going to use five stacked layers of .70" / 18mm  HomeDespot birch ply, as a suspended plinth, plus, a base shelf layer that is attached to the cabinet. I've yet to find a single void after making tons of cuts - fine wood. This is my second plinth out of it now.
I'm going to build in a suspension system, utilizing 1.5" Mighty Morpin Power Rangers Super-Balls from BigLots that cost a whopping $2 for two two-packs.

let the cipherin' begin;


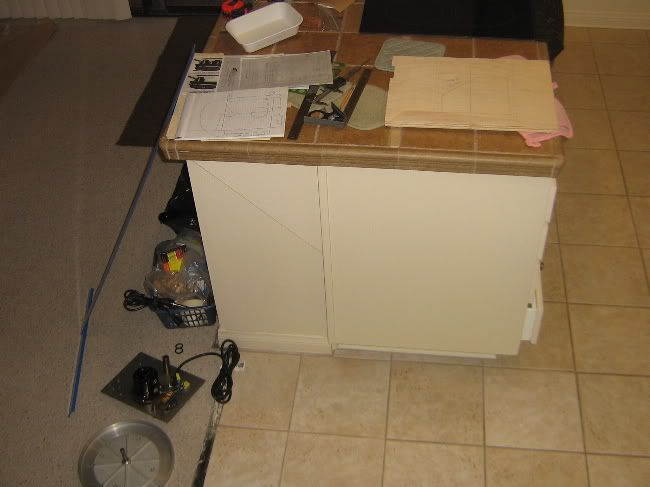
the end of the kitchen peninsula counter is where I do my thinking and drawing:


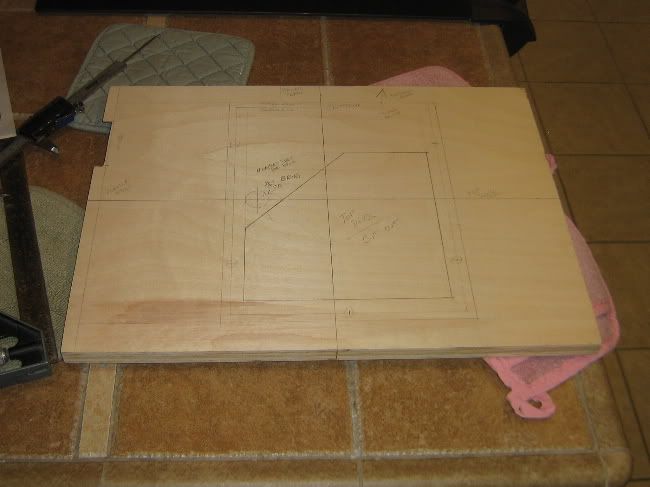
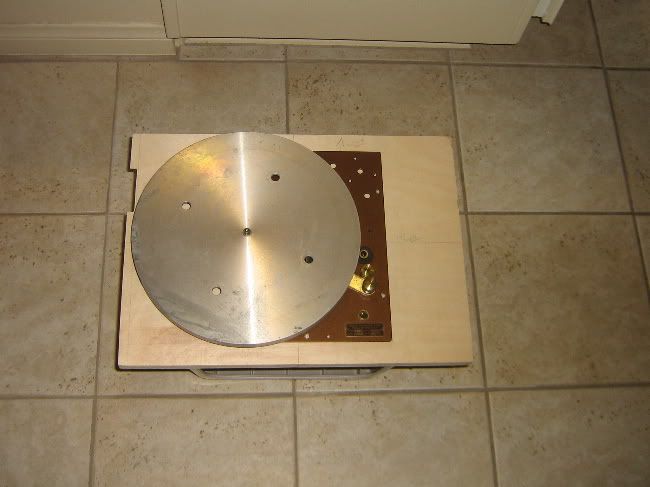
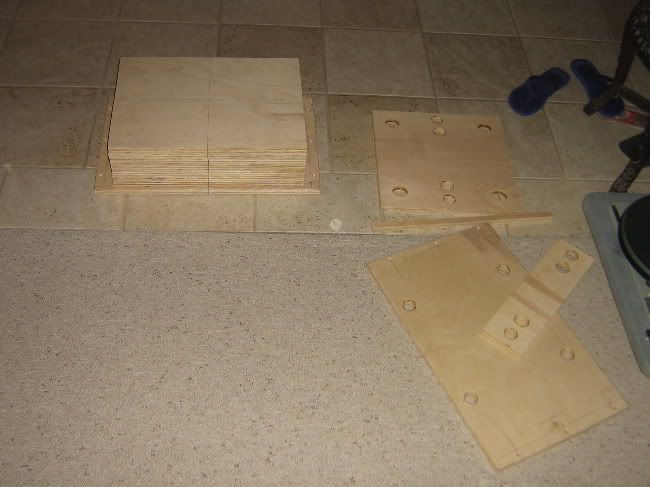
cut-out top deck layer (layer 5):


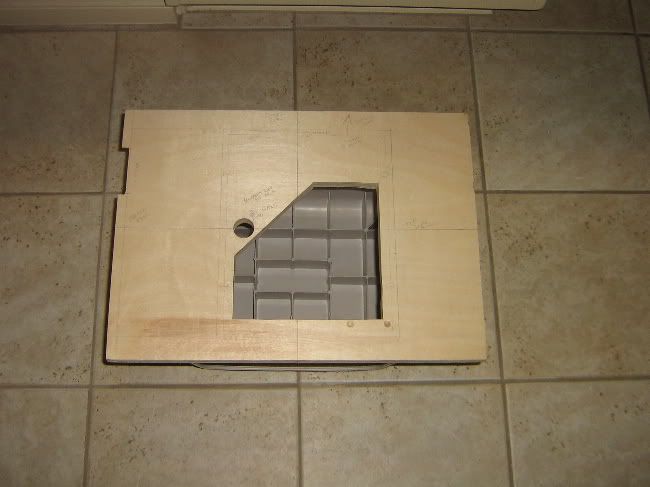
On the inverted stool plinth:
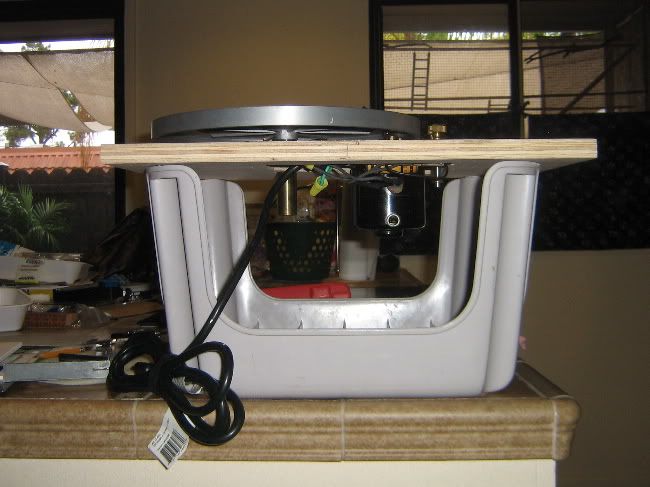
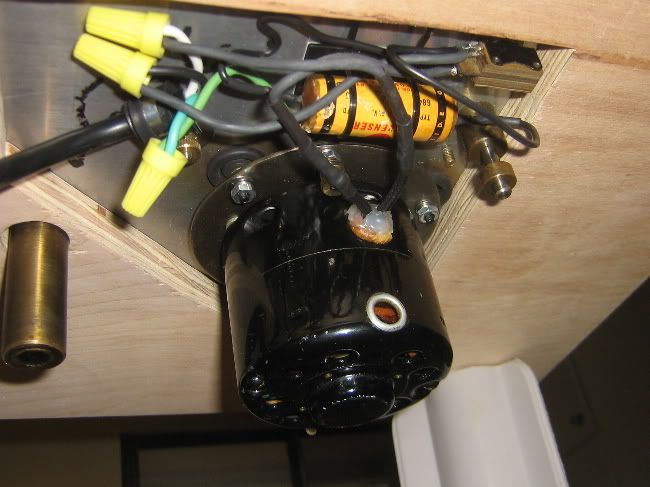
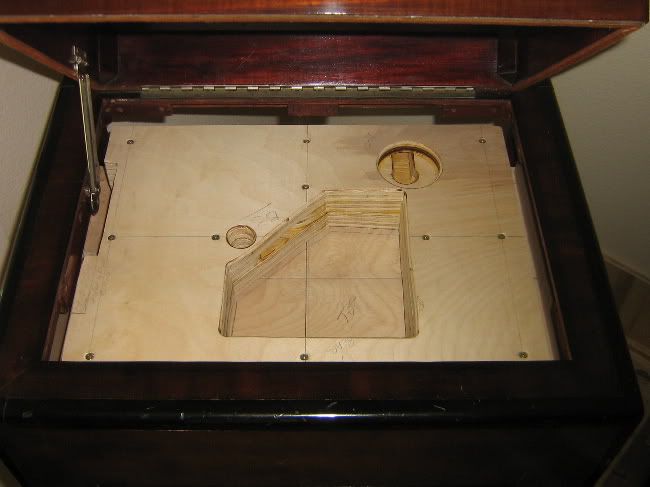

the underpinnings:


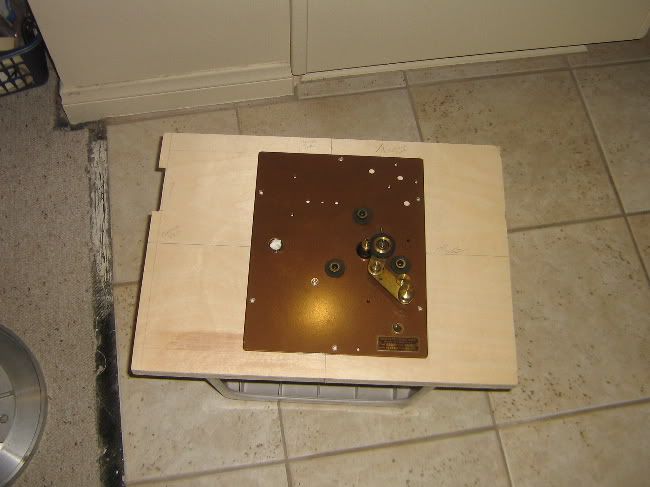
in the cabinet, with the rest of the layers cut to match:


I'm going to use a metal sheet over the wood, of either real copper, or, hammered copper painted on aluminum. The wood top deck will be painted black, lacquer black gloss, to match the trim, with the metal top deck mounted over it.
The arm wants to fit half on the original top plate, and half off of it. So I'm going to have to rig an arm board extension to the side of the top plate to carry half the tonearm base, and level it.

Next up,... the backside development, and the Mighty Morphin power Range Superball suspension! I know y'all are dying to see this one ::laughs maniacally::

plinth suspension test boards, with the mighty morphin power rangers:


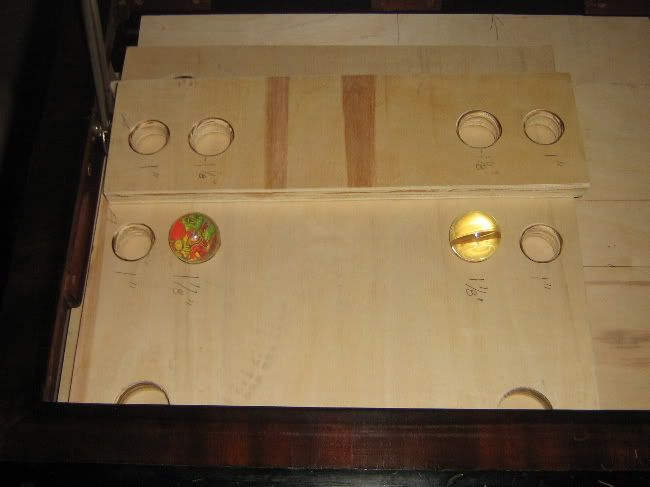
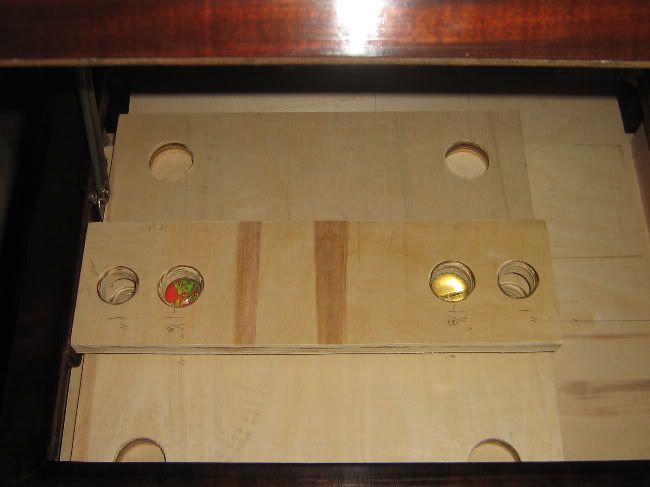
The two boards, ^^, represent the base shelf layer that is attached to the cabinet and, the turntable plinth, which is supposed to be suspended and isolated from the cabinet.
I found that the Lenco spring suspension plinth eliminated resonant cabinet feedback, so I decided to incorporate a suspension system within this plinth build.
My wife found some superballs at a clearance store chain that were an inch and a half in diameter.
The boards were utilizing various levels of contact and containing of the balls. I finally settled on a clear pass-thru hole for the bottom of the suspension layer, and a capturing smaller diameter at the upper layer.
The bottom layer depends on the ball riding on the tangential apex contact of the curve of ball and supporting surface on the bottom, and, the plywood rim around its center diameter (1.40" ball diameter and 1.5" hole saw cutout in .70" plywood).  The top layer solidly captures the ball around a ring about 3/4 high on the ball (a 1" hole, with rounded over edge).

Here is the stack of layers of plinth plywood leaves on the base, testing the suspension - trying for overload:


Here is a view of the plinth in early fitting stages, with the superballs in place:


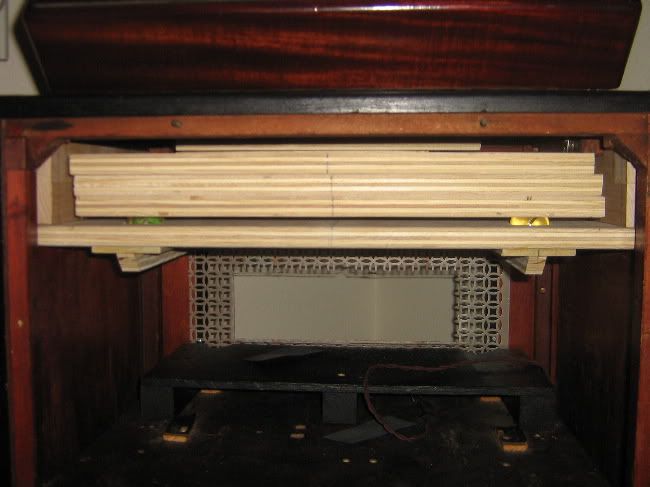
The staggered offset of the ply layers centerline, above ^^, is due to the lid prop cut-outs not being done yet. I took the picture before I'd cut them out. So there is the staggered offset present; which has since been corrected.

Base layer with suspension bearing balls:


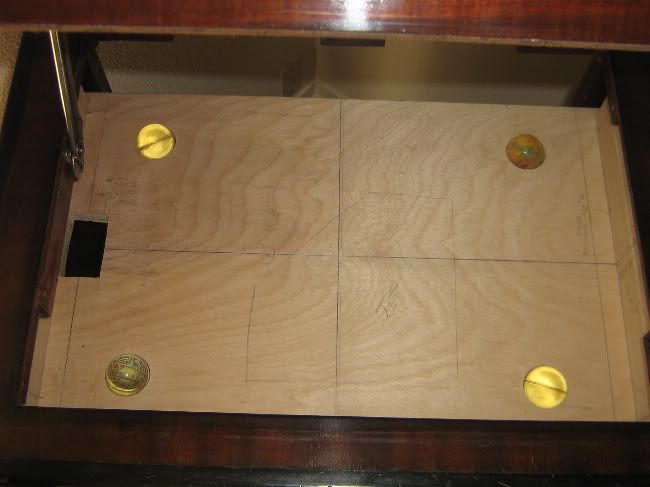
layer 3 - now laminated to b1 and b2, with tonearm cutout base structure. THe keyhole at the bottom is to pass a cable through to the tonearm base mounting plate:


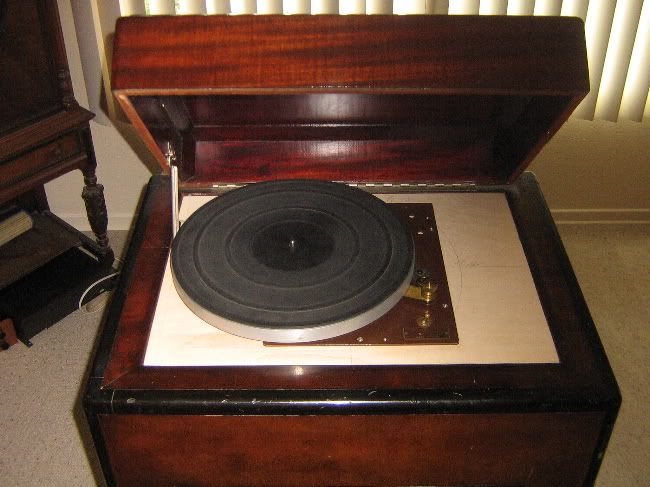
plinth painted flat black.


The base layer and b1,2,3 are separate from the 4th and 5th top layers. They are all screwed together into a monolith, but need to be separate for assembling.
There are five total layers of minimal cut-away layers as a base.

Now with the addition of a solid copper top plate that the TT mounts to:


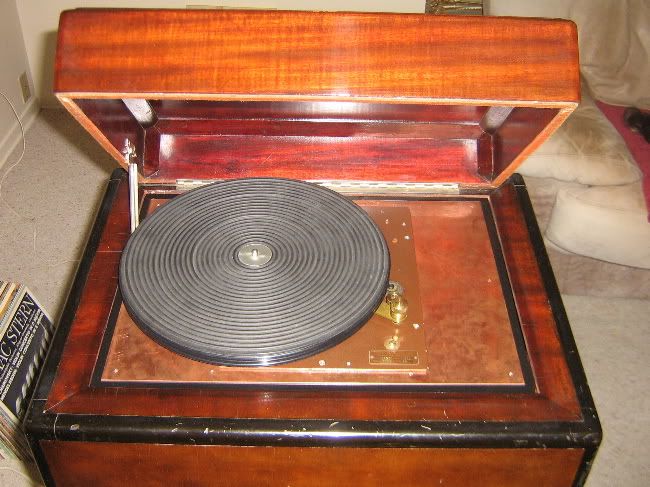
Up next,... the tonearm mounting.
I've got to level the arm area, as the arm wants to hang off of the original top plate. The OR top plate is 1/8" thick, which is easy enough to match. Then I want to add another thin layer to cover the OE top plate holes and bridge over onto the additional extension of the top plate (the 1/8" elevation offset addition).


Offline it-goes-to-eleven

  • Trade Count: (58)
  • Needs to get out more...
  • *****
  • Posts: 6696
Re: Building My Monaural Playback System
« Reply #40 on: October 09, 2010, 02:29:11 PM »
Nice!  It looks like a verry satisfying project...

mfrench

  • Guest
  • Trade Count: (0)
Re: Building My Monaural Playback System
« Reply #41 on: October 09, 2010, 10:55:12 PM »
Its a challenge. Yeah, I love that feeling, especially when its ready for its first spin.

Ok,.... I spent the afternoon whitllin' some copper and aluminum.
The tonearm is essentially fitted. I had to "shim it" to matching height with 1/8" alum. to match the thickness of the original (oe) top plate.
Because the arm base is round, the extension looked best as being round (to my eye). So I gave it a radius, and curved it back into the original plate.
I used the cut-away piece of copper from the motor cut-out, and refitted it to the purpose of covering a bunch of already present drill holes, and as the extension for the tonearm base. So, its shape is somewhat dictated by the shape of the scrap piece, which just happened to lend itself well to the task.
At present, its just placed, and not fastened into place; I'm still dry fitting. I'm going to use two existing holes in the top oe plate. The tonearm is also footed through one of the existing holes in the oe plate.

Next up,... the final tighten up!


mfrench

  • Guest
  • Trade Count: (0)
Re: Finished Project: Building My Monaural Playback System
« Reply #42 on: October 12, 2010, 04:40:49 PM »
Here is Audrey, finished, and spinning her first tunes - Guy Lombardo mono 33.3:


OK,... its finished, completely. I soldered up the tonearm output connectors, and,... nothing; WTF??
I loked more closely at the soldering and the tiniest speck had come off and attached itself to the rca connector, soldering together the + and - leads, which cancelled each other out, to produce nothing.
So, a utility knife to pop that little discrepancy, and we're making really cool tunes!
So, Audrey is now a finished a reality. The suberballs allowed for cranking it to 11, without any resonant feedback; so the isolation theory worked. 
The arm is really cool!
Sarge even commented on it. She'd strongly suggested thinking it was this clunky thing, until she tried it.

Offline Gutbucket

  • record > listen > revise technique
  • Trade Count: (16)
  • Needs to get out more...
  • *****
  • Posts: 15734
  • Gender: Male
  • "Better to love music than respect it" ~Stravinsky
Re: Finished Project: Building My Monaural Playback System
« Reply #43 on: October 13, 2010, 10:31:41 AM »
Really looks great.

Spin the Django record again.
musical volition > vibrations > voltages > numeric values > voltages > vibrations> virtual teleportation time-machine experience
Better recording made easy - >>Improved PAS table<< | Made excellent- >>click here to download the Oddball Microphone Technique illustrated PDF booklet<< (note: This is a 1st draft, now several years old and in need of revision!  Stay tuned)

mfrench

  • Guest
  • Trade Count: (0)
Re: Finished Project: Building My Monaural Playback System
« Reply #44 on: October 21, 2010, 09:31:44 PM »
OK,.... I'm thinking about improving the speaker in this thing. Its 6", and small for the cabinet; Sarge agrees.
I'm looking at 8" speakers because the original plywood mounting panel had a cut-out for an 8" speaker; the 6" is mounted to a secondary mounting panel that screws to the main mount panel.
I'm debating on either a coaxial speaker, or, possibly a full range single cone (a Betsy by www.wildburroaudio.com)

I'm also debating a 10" speaker, because it can be shoehorned in.  The mount panel for the speaker can handle the larger diameter speaker, but, the opening on the cabinet face would obscure the surround of the speaker, but not the cone.
Given the coaxial speaker, I'm not so worried about obscuring the surround of the "woofer" full range speaker; so I think it might work.

I guess my question is,...
Is thinking about a 10" speaker being greedy here? Overkill??
Or would I be better served staying with an 8" speaker?

The inside of the cabinet measures roughly 18"x18"x18" within the speaker portion of the cabinet, though, the entire interior of the cabinet is open and non-baffled, with exception to the TT shelf and the amp shelf, neither of which are sealed compartments.
To go 10", I'd need to create a new mounting panel - not really a problem.
To go 8" is far closer to a straight bolt-in exchange.
« Last Edit: October 21, 2010, 09:34:06 PM by m0k3 »

Offline andromedanwarmachine

  • Trade Count: (0)
  • Taperssection Member
  • ***
  • Posts: 267
  • Gender: Male
  • waiting for the perfect thunder storm
Re: Finished Project: Building My Monaural Playback System
« Reply #45 on: October 22, 2010, 08:27:42 AM »
I would say the larger the speaker, the better the tone in this case, but you might end up with a power issue- you don't want to stress the amp.
Do you know what power headroom it's producing...?

JimP
Phillips N2233 "full auto shutoff"> Aiwa HSF-150 (x2)> Sony WM-D6C (x2)> Sony TCD-D3> Sony MZ-R3> Marantz PMD-650> Sony MZ-RH1> HHB Portadisc> Macbook 13"& M-box 2 +ProTools 8! and now Nagra LB!

http://soundcloud.com/andromedanwarmachine
http://soundcloud.com/bells-of-scotland
http://soundcloud.com/bells-of-the-world

mfrench

  • Guest
  • Trade Count: (0)
Re: Finished Project: Building My Monaural Playback System
« Reply #46 on: October 22, 2010, 09:03:58 AM »
Jim,
thanks!
I looked for any specification that dealt with your question, and found none (in the manual). So, let me describe it this way,....
The volume knob is also the on/off switch. Its off at the 7o'clock position. At 8, its on, but no sound level.  Our normal listening has been variable at 10->11 position, with 12o'clock becoming fairly loud, and 9o'clock being a quiet background level. 1 o'clock is fairly unknown level of listening for us.
At the 11:30 position, we can start to overload the 6" speaker, and start smearing frequencies into distortions.

The speakers that I've been looking at are old console speakers from the low wattage tube days; Utah, Altec-Lansing, an Onkyo coax, European Saba's, etc.
At any rate,... I've been looking at "tube friendly" high sensitivity vintage speakers, to try to help with the tubes.

thanks again!

mfrench

  • Guest
  • Trade Count: (0)
Re: Finished Project: Building My Monaural Playback System
« Reply #47 on: October 22, 2010, 11:07:49 PM »
As it turns out, my speaker is of the 8" category, despite measuring just a little over 6" (like 6 3/8")
I found an inexpensive 8" coaxial ceiling speaker today, with a nice sensitivity.  It is a  speaker intended for in-ceiling pa systems, and 25/70v, with a transformer.
I took the transformer off, and reverted back to 8ohm. Beyond that it was a straight bolt-in swap out.
Overall, it was a substantial improvement in both high freq, and low end.
The low end of the original had a fuzz around it, and the highs were getting smeared in distortions.
Now with the separate drivers, each is handling its own range without the smudging. The bass is far more refined and articulate. Its now more appropriate as a corner speaker, as there is far less tendency to overstate itself and get fuzzy around the edges.
The highs,... well Sarge has commented numerous times already about how much more revealing the highs are, suggesting sizzle in the cymbals where there was none before.
So we've freed up the high spectrum substantially as well.
Overall, even with an inexpensive speaker, its a fine improvement. Its probably not an ideal speaker, but, a very reasonably priced excursion and experiment. So, I now feel it a reasonable endeavor to upgrade it to an even finer degree. I'll let this run in for a bit, and see where it goes, as its enough of an upgrade as is, to not feel a need to change it out too quickly.

Offline andromedanwarmachine

  • Trade Count: (0)
  • Taperssection Member
  • ***
  • Posts: 267
  • Gender: Male
  • waiting for the perfect thunder storm
Re: Finished Project: Building My Monaural Playback System
« Reply #48 on: October 26, 2010, 05:51:05 AM »
you know- that's not such a bad idea- you're balancing compressed-response original electronics with inexpensive, easy to drive, tweaked-to-account-for less than ideal mounting-scenario drivers...

Ceiling speakers, whilst inexpensive are not without design. And the design is to account for alot of grille and 90 degree off-axis auditioning; people don't "hear" upwards- they hear forwards and as such, ceiling drivers are a little brighter to accomodate.

The tone would be very flattering I'm sure...

JimP
Phillips N2233 "full auto shutoff"> Aiwa HSF-150 (x2)> Sony WM-D6C (x2)> Sony TCD-D3> Sony MZ-R3> Marantz PMD-650> Sony MZ-RH1> HHB Portadisc> Macbook 13"& M-box 2 +ProTools 8! and now Nagra LB!

http://soundcloud.com/andromedanwarmachine
http://soundcloud.com/bells-of-scotland
http://soundcloud.com/bells-of-the-world

mfrench

  • Guest
  • Trade Count: (0)
Re: Finished Project: Building My Monaural Playback System
« Reply #49 on: November 01, 2010, 09:18:08 AM »
Thanks, Jim
This link goes a long way to providing insight into this system
http://www.bobdylan.com/#/media/videos/stick-with-mono
I think I'll stick with mono :)

the new speaker has really made a big difference, more coherent. But it did not lose its vintage appeal either.

Offline Chilly Brioschi

  • The fool doth think he is wise, but the wise man knows himself to be a fool.
  • Trade Count: (0)
  • Needs to get out more...
  • *****
  • Posts: 15469
  • Gender: Male
  • Waiting for the next cladogenetic event, or Godot
    • Oceana North America
Re: Finished Project: Building My Monaural Playback System
« Reply #50 on: November 16, 2010, 11:47:09 PM »
My Mama says that I should be careful about kissing "easy" girls, 'cause I might catch some Mono.       ;D


+T for renewing, recycling, and reinventing!
Some very clever work and a fine-looking project!
« Last Edit: November 16, 2010, 11:51:23 PM by I Tape »
"Peace is for everyone"
        - Norah Jones

"Music is the drug that won't kill you"
         - Fran Lebowitz

Offline it-goes-to-eleven

  • Trade Count: (58)
  • Needs to get out more...
  • *****
  • Posts: 6696
Re: Finished Project: Building My Monaural Playback System
« Reply #51 on: April 23, 2011, 06:35:33 PM »
This is my eventual mono restoration..  It worked when I last tried it, 20 years ago.  It is likely a Philco 47-1230, built in 1947 (haven't checked the tag on the back).  It originally sold for $239.95, about $2404.52 in inflation adjusted dollars.  Automatic record changer, AM, FM and shortwave.


Offline Gutbucket

  • record > listen > revise technique
  • Trade Count: (16)
  • Needs to get out more...
  • *****
  • Posts: 15734
  • Gender: Male
  • "Better to love music than respect it" ~Stravinsky
Re: Finished Project: Building My Monaural Playback System
« Reply #52 on: April 23, 2011, 09:52:37 PM »
Wow, that thing is gorgeous.
musical volition > vibrations > voltages > numeric values > voltages > vibrations> virtual teleportation time-machine experience
Better recording made easy - >>Improved PAS table<< | Made excellent- >>click here to download the Oddball Microphone Technique illustrated PDF booklet<< (note: This is a 1st draft, now several years old and in need of revision!  Stay tuned)

mfrench

  • Guest
  • Trade Count: (0)
Re: Finished Project: Building My Monaural Playback System
« Reply #53 on: April 24, 2011, 11:00:46 AM »
that is really nice.
It sure does look like a philco, too. I looked at a bunch of cabinets and phonographs, and saw several Philcos available, and that definitely has the look.

Restoration:
You are going for a faithful restoration?
Does the TT have multiple speeds?  Its right at the cusp of the introduction LP and 45 microgrooves.

Offline it-goes-to-eleven

  • Trade Count: (58)
  • Needs to get out more...
  • *****
  • Posts: 6696
Re: Finished Project: Building My Monaural Playback System
« Reply #54 on: April 24, 2011, 11:44:45 AM »
It does not appear to support 45's.  The phono controls are on/off, auto-manual, and reject.

I'm not sure what I'll do for restoration.  It is something I need to do a bunch of study on.  For now, it sleeps in a safe place, and looks great doing it.  I found a great deal of restoration and forum activity around these models, so that will help a lot.  The fact that it has been working and hasn't been messed up with shody repair work is a nice bonus.

Minimally it needs to be re-capped, mechanicals gone through, etc.  My requirement for the phono is that it does not harm 78's.  I have a friend who does do speaker re-coning, so that is an option when I get to that point.  There are the big questions of whether I retain the phono, amp, and speaker.  It'd be nice to wire in some alternate inputs so I can play old time radio shows digitally, etc.

mfrench

  • Guest
  • Trade Count: (0)
Re: Finished Project: Building My Monaural Playback System
« Reply #55 on: April 24, 2011, 11:58:15 PM »
You should worry about the shellac wearing out the needles.
They come from a time of the pickups weighing in in the multiples of ounces, which is also directly the tracking weight.  They would wear out the steel needles in a few plays.


RSS | Mobile
Page created in 0.201 seconds with 80 queries.
© 2002-2024 Taperssection.com
Powered by SMF