My new Tascam DR100mkii was delivered today, so I'm gonna start a review since this just started shipping this week. I'll add to the review as I test this thing out, so check back every so often.
I paid $330 from B&H with free ground delivery from UPS. I ordered it on Tuesday and it arrived on my front step this afternoon, which is Friday.
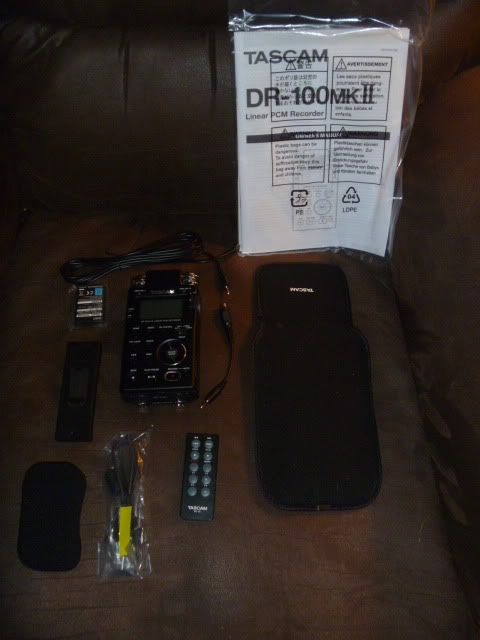
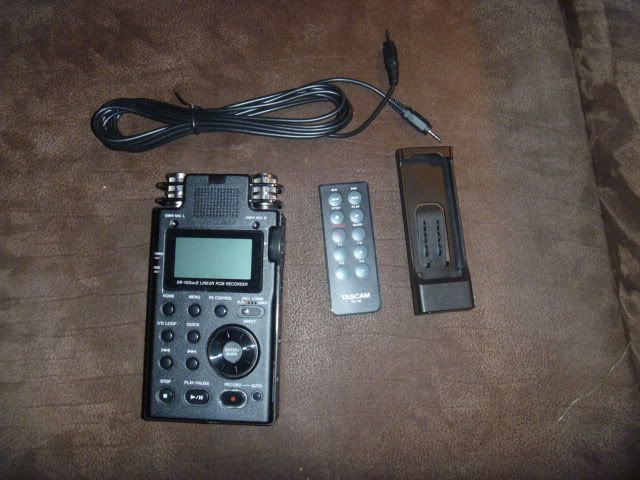
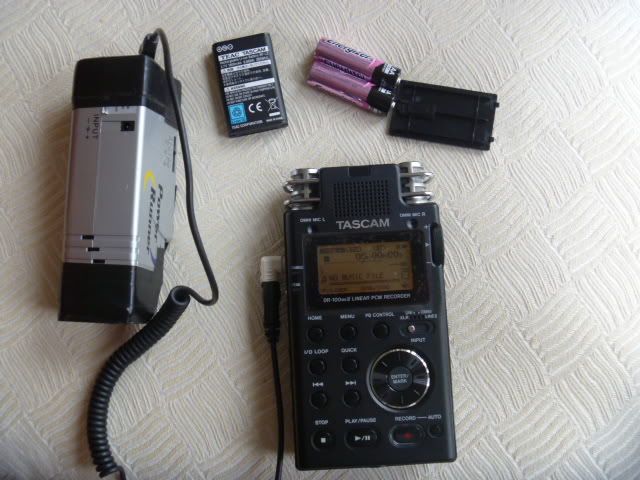
First thing is to discover what's included in the box. Check out the following picture...starting from upper right and working clockwise around the attached photo, all of the following items were included in the box.
- Users manual and warranty cards
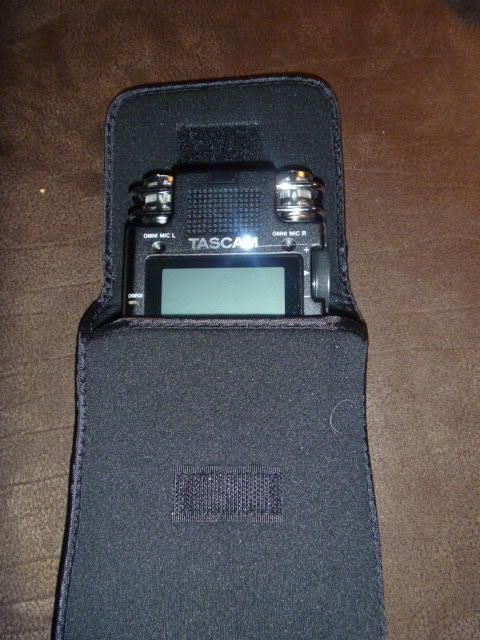
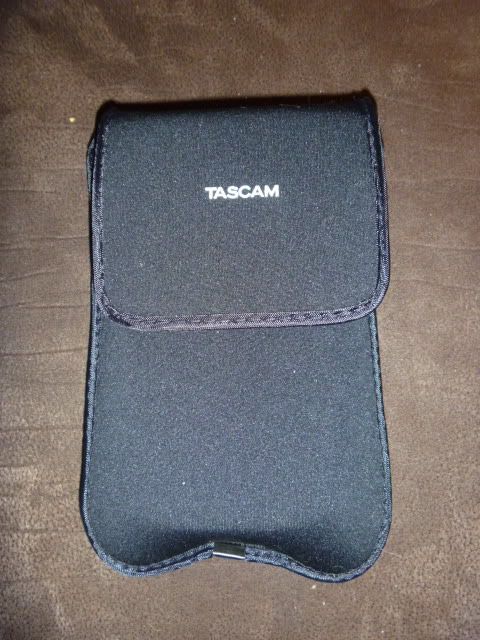
- Neoprene case
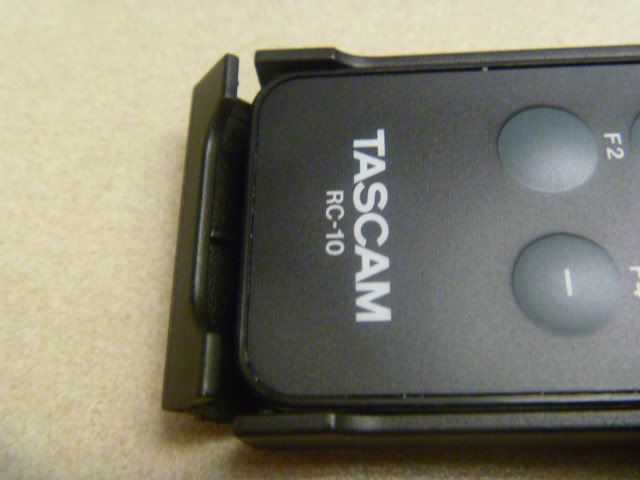
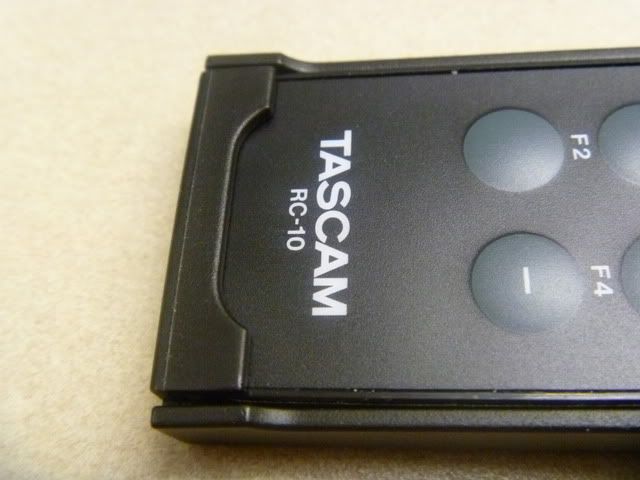
- Wireless remote control with battery (clear plastic sheet is pulled out to activate battery and keep it from running down prior to use)
- Mini-USB Cable
- Windscreen (slips over the top end where the mics are located)
- Wired remote case (the wireless remote is inserted into this case to convert the wireless remote to a wired remote)
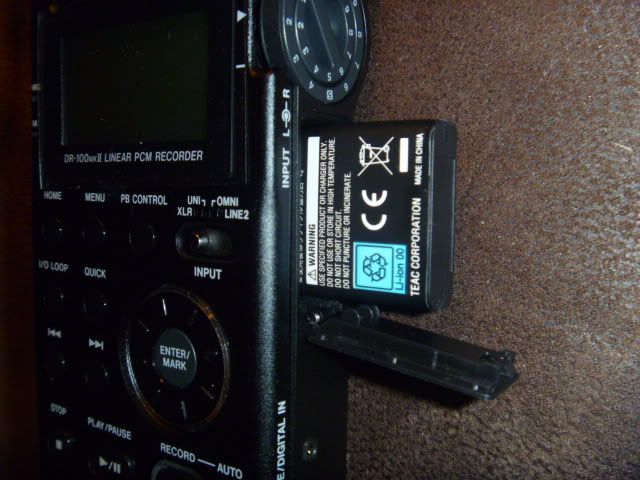
- Li-ion battery
- 8 foot long male-min > male mini cable for connecting the wired remote case to the recorder
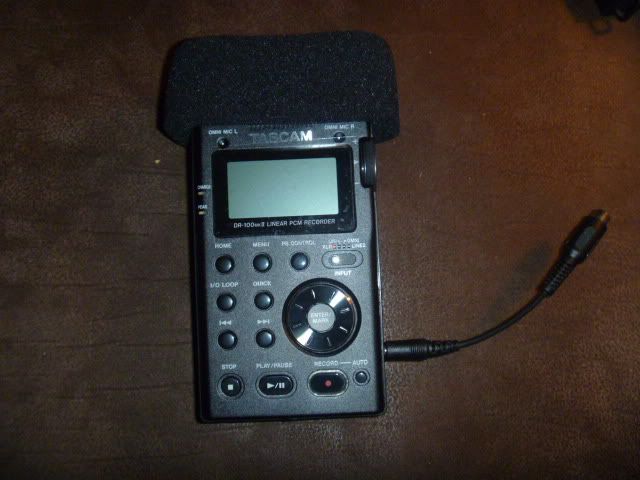
- Tascam DR100mkii
- RCA > mini digital input cable
Here are some closer-up images of the unit itself...
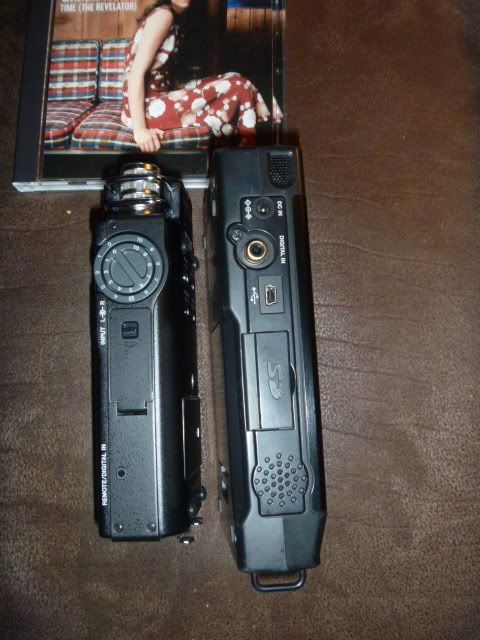
The first thing I was curious about was the size. Here are a few photo's to show the relative size of the unit (compared side-by-side with a PMD-661)
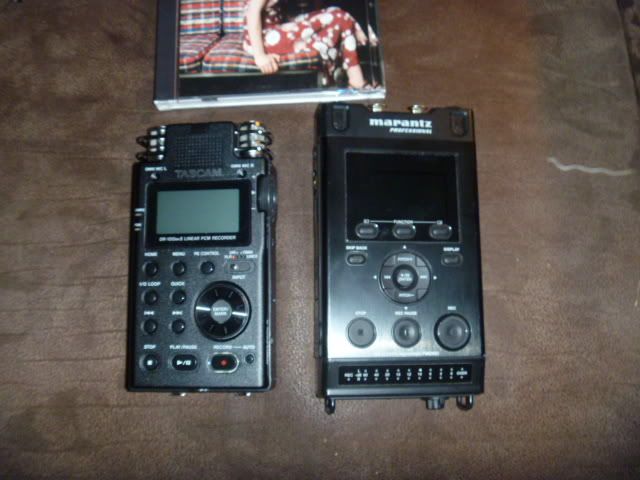

I like the fact that a protective case is included standard with the recorder. Sony charges an extra $30 for theirs.
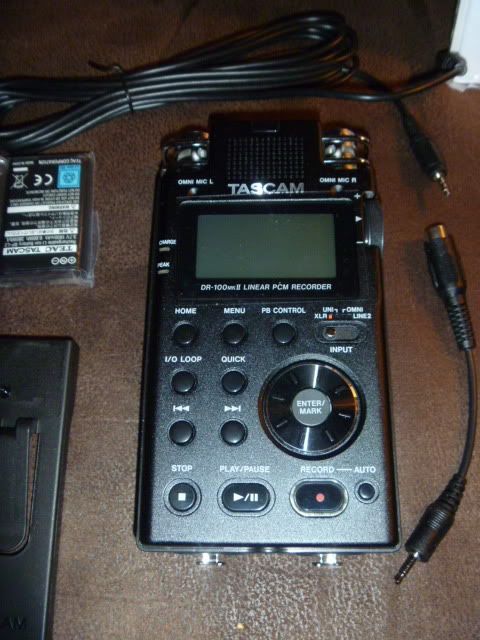
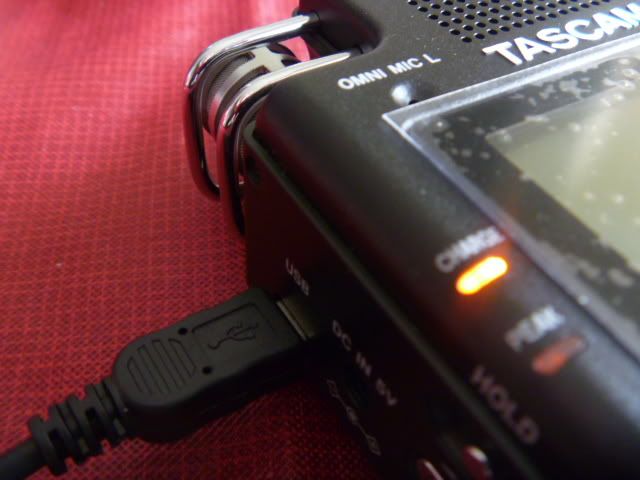
The two main features that appealed to me about this recorder are the digital input and the dual battery option. I immediately checked both out. I noted that the mini-jack fits with the right amount of snug-ness...I was concerned that it might be too loose and be prone to losing connection, but has a good feel of 'not too much, but not too little'.
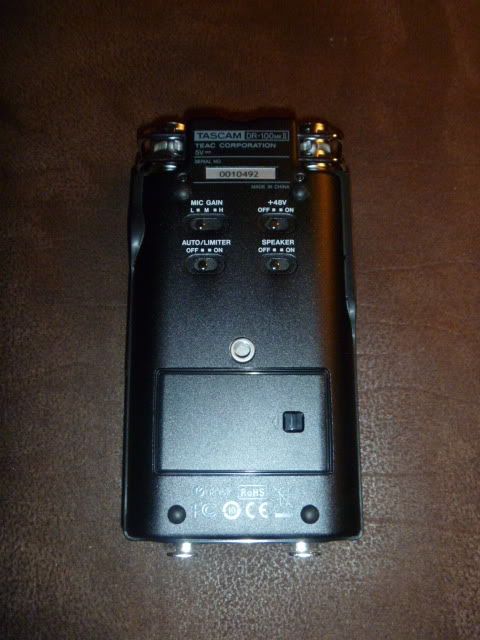
A slightly annoying feature of the Sony M10 is that the switches on the back are a little too easy to bump out of position accidently, so I taped those to keep it from happening. No tape needed on this unit...these switches are both recessed and need a little bit of force to move to the next position.
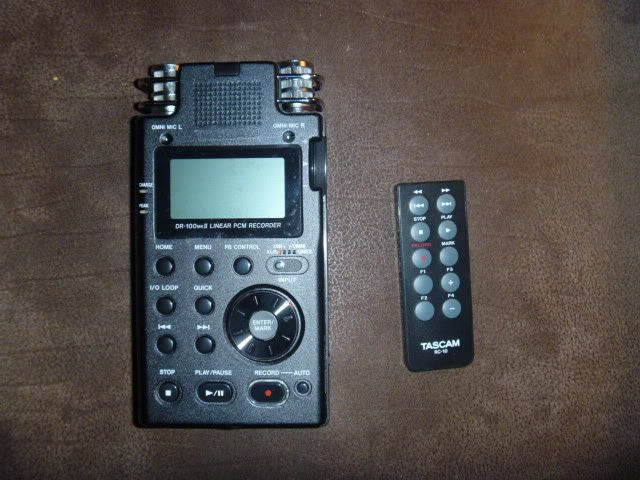
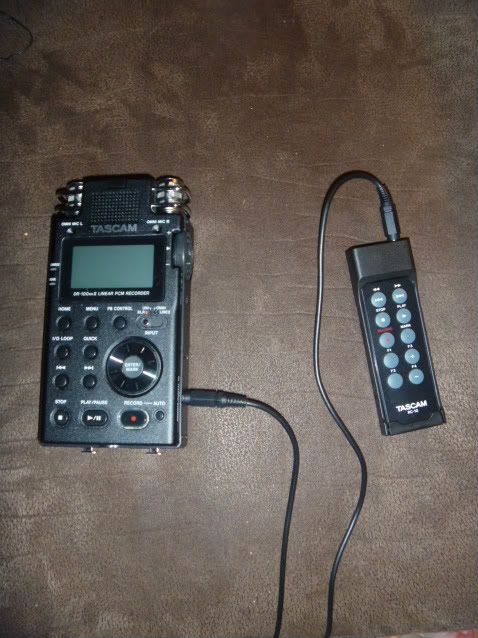
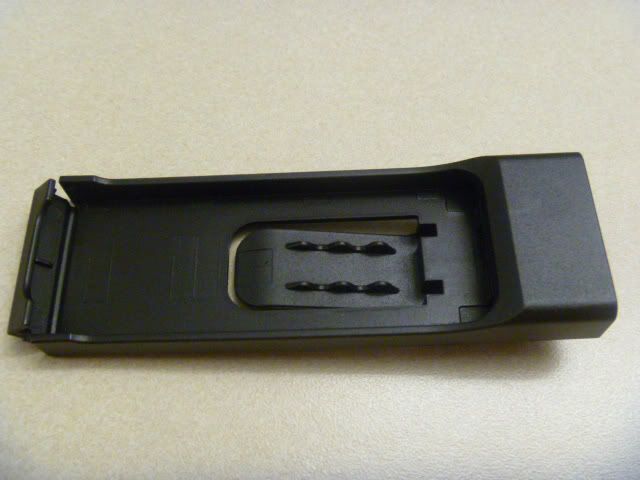
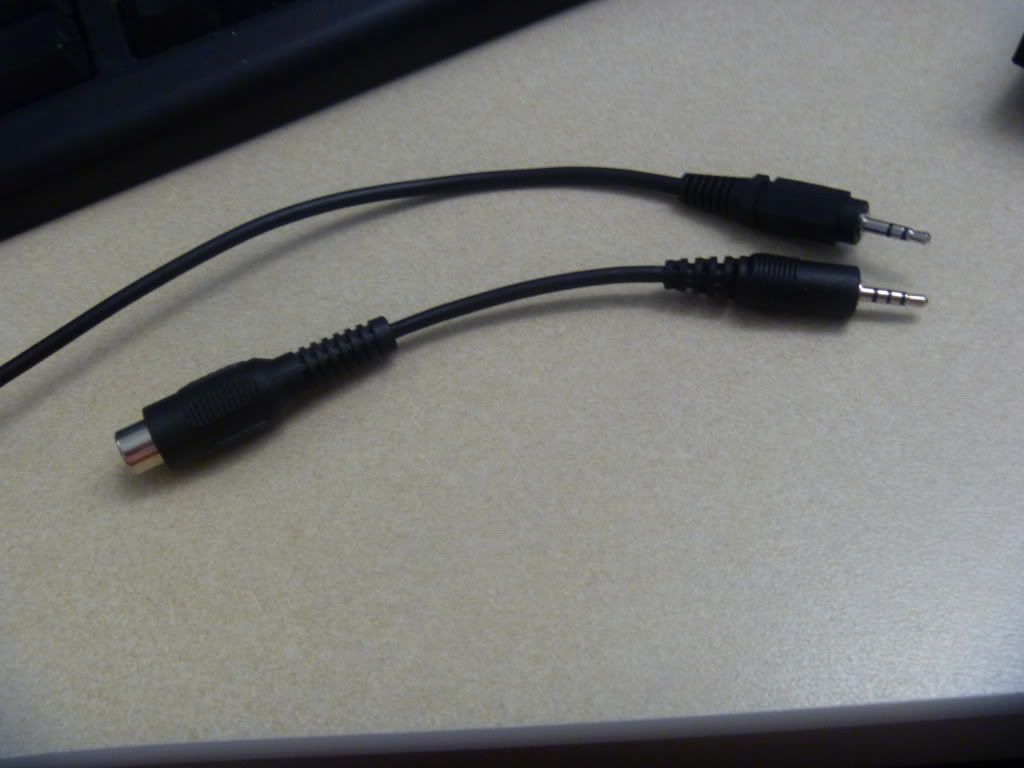
I'm not sure how much I'll use the wired remote, but it came as a surprise to me that the unit comes packaged with both wireless and wired capability. The wireless remote is inserted into a holster that has a belt clip on the back. An eight foot long cable connects the holster to the unit. For better or worse, the jack that connects the wired remote is the same jack as is used for the digital input. Obviously, that means the wired remote can't be used at the same time as the digital input. However, we'll have to wait and see until later in the review if there are any issues with using the wireless concurrently with the digital input. [EDIT; 2011-12-27: After further testing, the wired remote DOES work at the same time as the digital input. My initial assumption was wrong....NICE!!!]
The first photo shows the parts disassembled and the second photo shows the wireless assembled and connected.
Picking the unit up and giving it a first feel through, it feels typically solid. Nothing really cheap feeling about the unit. I'm pretty sure I read that the body of the unit is made of aluminum, so that's a nice feature.
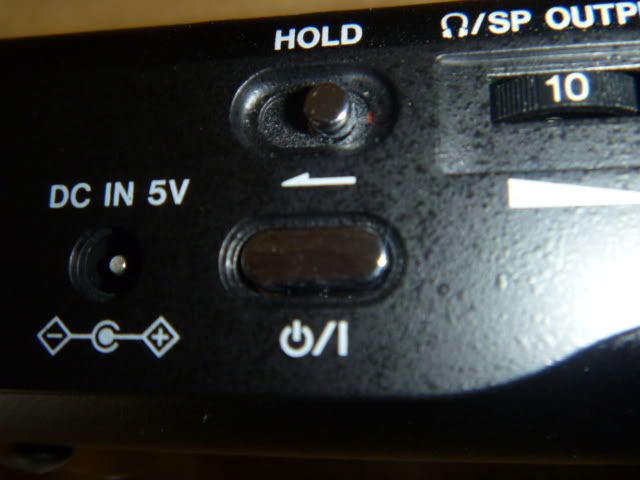
Obviously, first thing I did (before reading the instructions...who reads the manual before starting to play with their new electronics right?) was to turn the unit on. Nice! The on/off button requires a push and hold for about 3 or 4 seconds for the unit to turn on or off. This hold aspect is a nice feature because it can help to prevent accidental shut offs. I've owned units where it was easy to accidentally hit the power button (UA-5 for example) and this is a good 'attention to detail' feature.
Out of curiosity, I engaged the 'hold switch', which is located just above the on/off button, and the unit won't turn on when the switch is engaged and if the unit is on, the hold switch of course prevents the unit from shutting off.
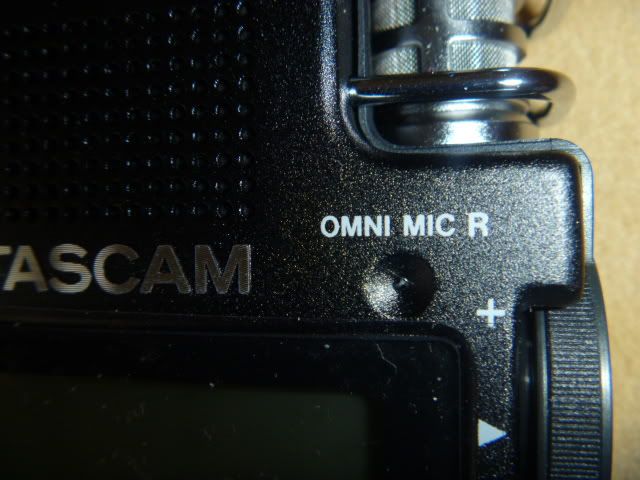
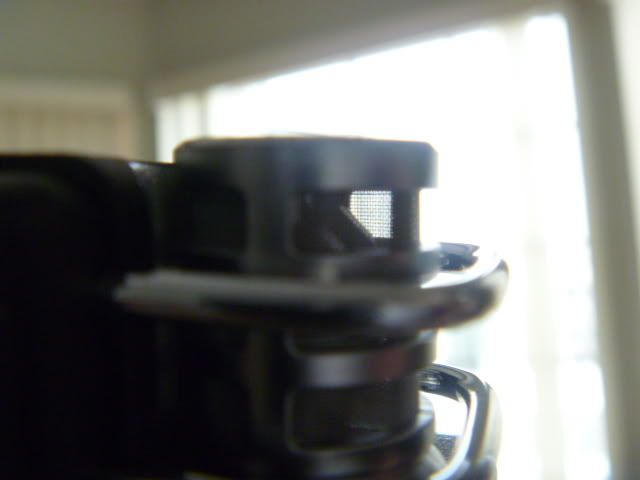
I'm sure the internal mics on this unit won't matter to many people on taperssection, but it has four built-in mics. The two omni's are shown in the following photo and they're on the face of the unit, while the directional mics are on the top of the unit. I was confused at first when I got this unit because it appeared that the directional mics on the top are arranged in parallel in an A/B mic configuration. That doesn't make alot of sense for directional mics that are only 2 1/2 inches apart. However, upon closer inspection if you hold the unit up to the light so you can see through the screens of the directional mics, you can see that the capsules on the inside of the screens are facing 45 degrees apart from each other. So, while the separation is still a little close for a classic DIN or DINa configuration, the mics are at least properly angled.
To test the directional aspect of the mics, I put the unit in front of my face and spoke while turning the unit around through 360 degrees. With the mics in the omni position, the unit does indeed have seem to have a good omni pattern, as my voice didn't seem to drop off at all as I rotated the unit through 360 of motion. Similarly, with the directional mics engaged, the unit has distinct directional pickup characteristics. Obviously, this was a totally non-scientific test method, but satisfied me that the internals will at least act as billed.
Not sure how well the following pictures will show it, but I tried to show how you can see the capsules inside the protective cage of the directional mics, showing that the capsule is oriented at 45 degrees.

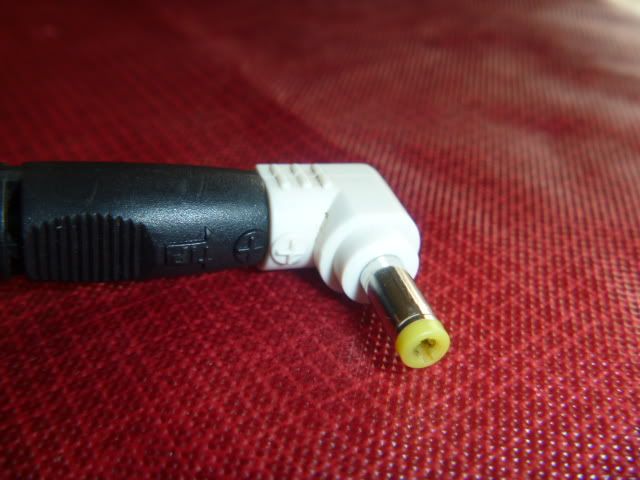
In addition to the dual battery situation previously shown, the unit can be operated with a five volt wall wart. As shown in the picture, the tip is positive. Notice that a wall-wart does NOT come standard with the unit, but it's available for optional purchase. I didn't find this to be such a big deal because I never use the wall-wart with my recorders. In the end, the only reason it's important to me is if I sell the recorder, the next guy asks for $25 off if the wall-wart isn't included if it originally came with the package. However, I can see where the wall wart would be needed for anyone that would be using this recorder, say to regularly record from the soundboard. (Note: I'll get to powering options a little later.)
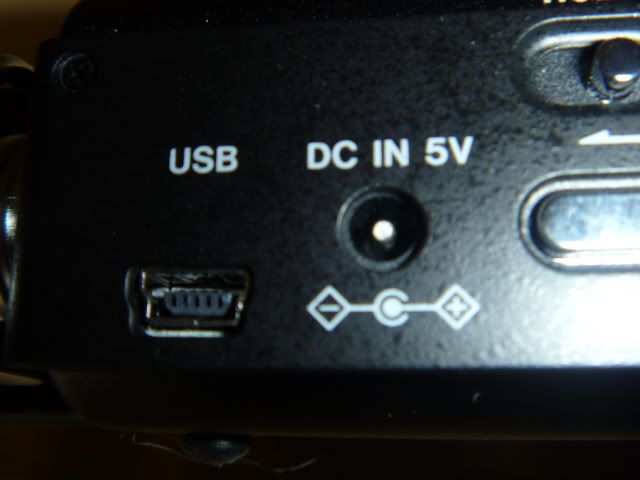
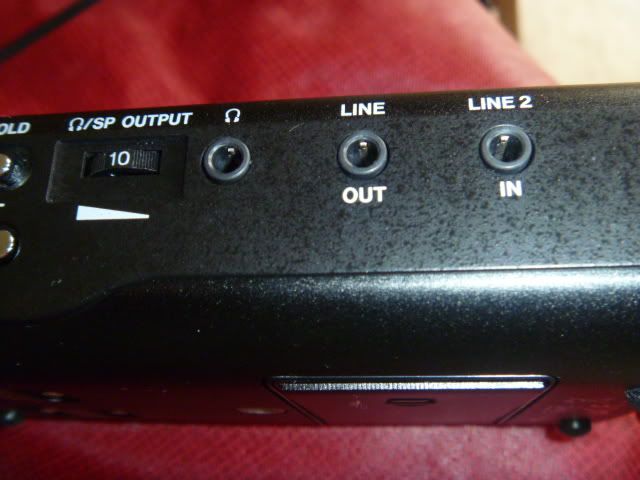
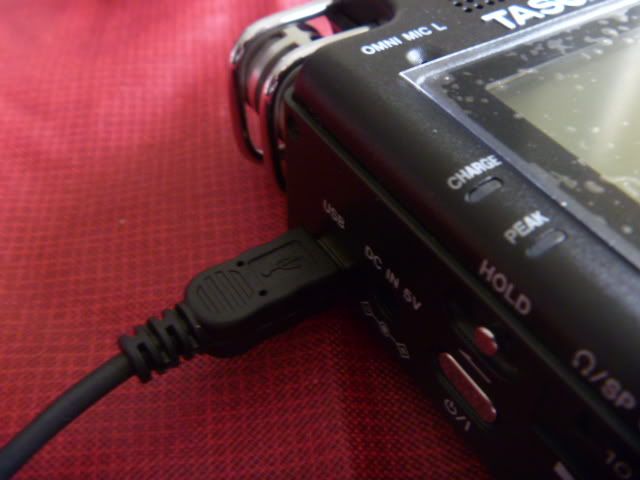
In addition to the on/off button and hold switch, the left side of the unit also has the USB port. An included standard mini-USB cable is used to transfer files and charge the internal battery. (Internal can also be recharged with either the USB or a wall-wart.) There is a headphone level control, 1/8 mini headphone jack, 1/8 mini Line Out jack and 1/8 inch mini Line In jack.
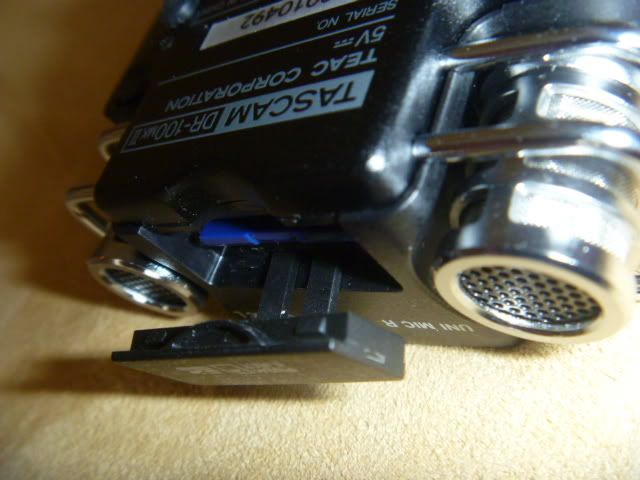
The top of the unit has the directional mics and the SD card slot. The SD card cover on most recorders is a small compartment door that flips open, but on this one it's more of a plastic cover similar to covers I've seen on the sides of alot of cameras. I think you can tell from the picture what I'm talking about. It's probably not a big deal, as long as the plastic cover never has issues or gets damaged (I suppose that could happen to a flip door too, so neither here nor there), but I think that a flip open door would have probably felt a more robust and high quality.
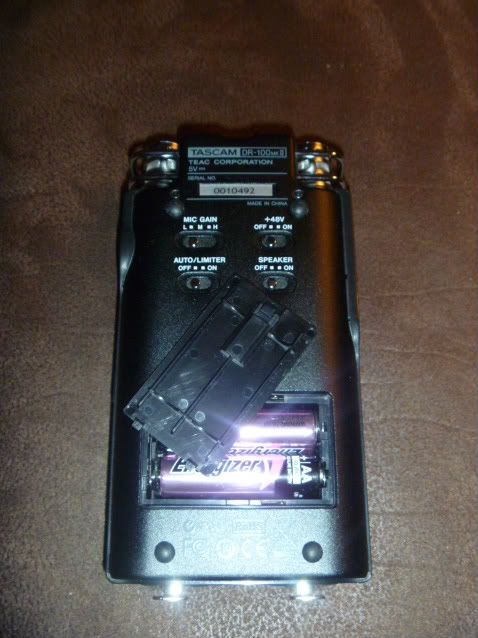
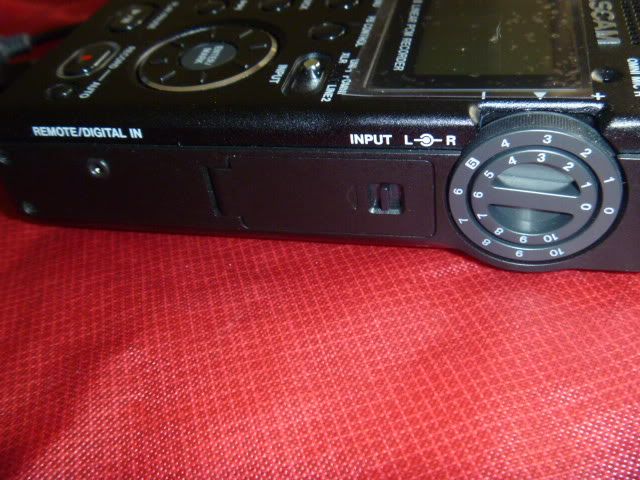
The right side of the unit has the level control knobs, cover for the li-ion battery, and the mini-jack for the wired remote and the digital in. I've always loved the design of this type of a control knob, where L and R can been independently adjusted, but for the majority of the time levels are adjusted on both L and R simultaneously. Note that the jack for the remote/digital input is a 2.5mm mini-jack. All of the other mini-jacks on the unit are 3.5mm mini.
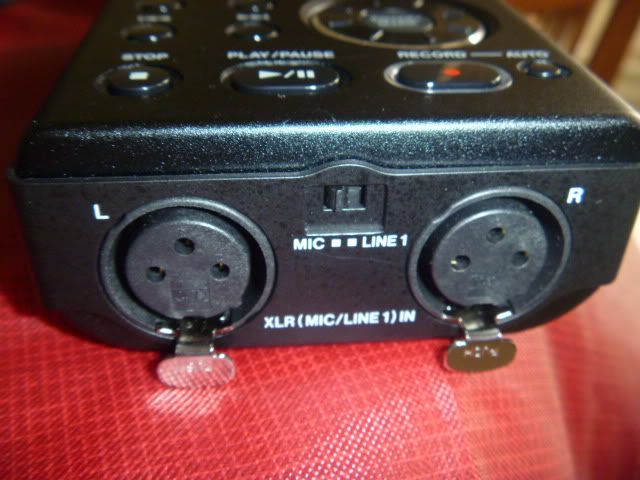
The bottom on the unit has the XLR connectors and a selector switch for mic or line levels on the XLRs. I learned to really like this feature when I owned a 702. This is also a feature on the PMD-661. The reason I liked it was that when I use an external preamp, this feature allows you to set the stock inputs on the recorder at line level...most of my external preamps sound a heck of a lot better than anything I've gotten (stock or modded) internal to an all-in-one recorder, so when I have the option, I've always preferred setting the XLRs at Line Level and max'ing out signal from my external pre.
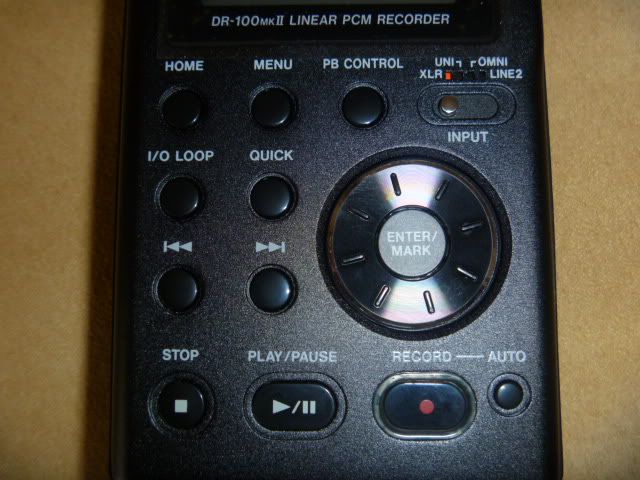
The front has all of the navigational controls and buttons. The main feature of the front is the navigation/spin wheel...I've always been a fan of this type of control so I really like this control. For those that are familiar with the ipod classic, it's essentially the same functionally except the wheel actually spins. When navigating a menu, you'll spin the wheel clockwise and counterclockwise to navigate through the menu. The button in the center is an enter or select button.
I do find that the front of the unit is little busy with lots of buttons and when you inventory what's there, you see a couple of buttons whose function isn't very obvious (and frankly, I'm not seeing them to be all that useful once I figured out what they do). Of course, it has the standard buttons for stop, play/pause, record buttons, >> and <<, menu and home. There are four buttons that just aren't all that obvious...PB control, I/O loop, Quick and Auto. I'll discuss what those do later.
Finally, there is an input selector switch at the upper right. This switch enables the user to select between XLRs, directional internals, omni internals, or Line In.
This concludes my initial 'once over' of the unit.
POWERING THE TASCAM DR-100MmkIIThe power scheme for this unit is innovative and probably the most unique design feature of the DR-100mkII. There are four separate ways to power this unit. What makes this a fantastic design feature is that all these options make for a situation where you will have both flexibility and control of powering when you are in the field...and this can be especially helpful if you are at a festival. So the four different options for powering are...
- Internal AA batteries (either regular or rechargeable)
- Internal Li-Ion battery
- External battery connected via the 5V connector
- AC powered via a wall-wart
The manuals says the li-ion recharges in 3 hours through a wall-wart but since I didn't have a stock wall-wart for this, I elected to initial charge the li-ion through the USB.
Last night before bed I plugged the unit into the USB on my computer. While it is charging, a red/orange 'charge' light is lit.
I'm not sure how long the battery took to charge from the USB, but when I got up this morning the battery was charged and the light was out.
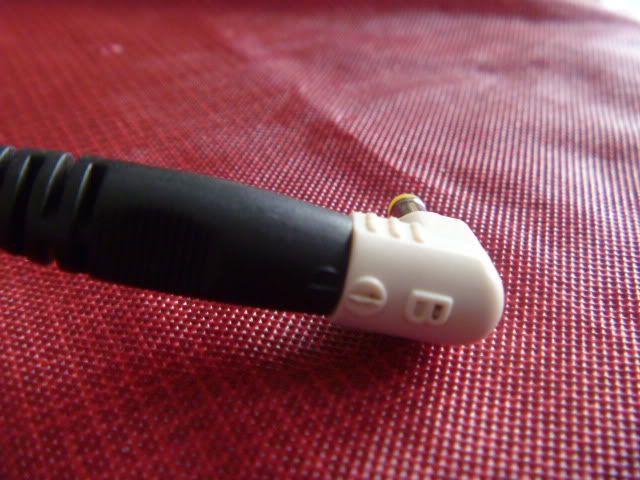
Note that the connector tip on the 5V was previously identified as tip POSITIVE. Upon closer examination and testing the size of the tip, it turns out that the tip used is the same tip as the PMD-661. Referring to Ted Gakidis' guide to equipment power tips, that means that the tip needed for this is Size B, 4.00mm OD × 1.70mm ID / Center pin (+) Ring (-) / Normal Polarity.
Taking both the AAs and the Li-ion out of the unit so that there's no internal power, I connected my Power Runner battery which was set to 5V and fired the unit up to verify that it will run without any issues on external battery power! YESSS! (Notice how the display indicated in the upper right hand corner that I'm connected to AC...actually I'm just supplying 5V DC from the external power jack!)

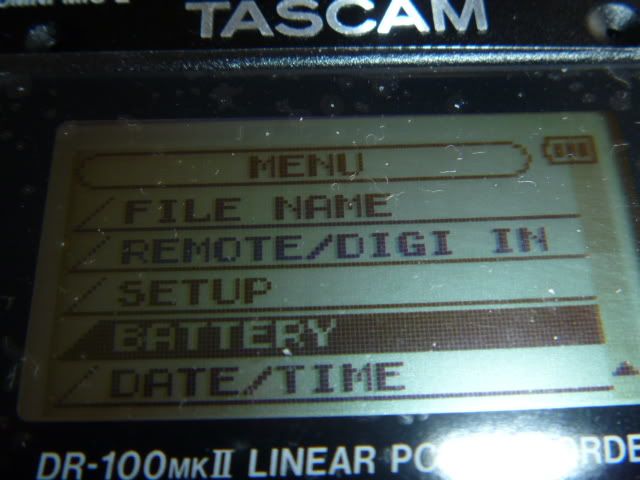
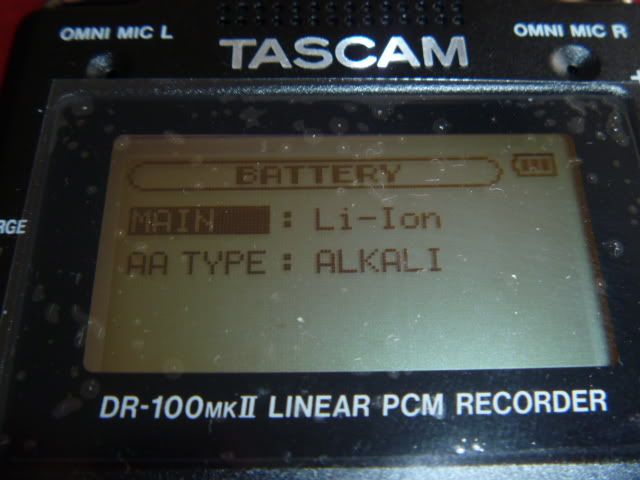
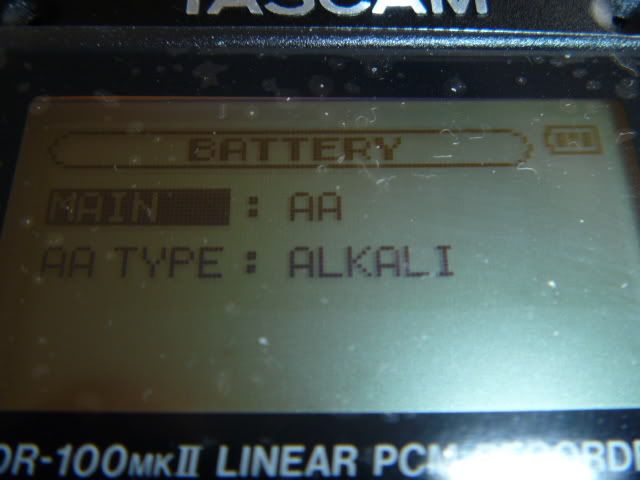
An interesting feature of this recorder is that the either the Li-ion or the AA batteries can be selected as the main battery. Use the menu as shown below to select which battery you want to have as the main battery. This selection causes the recorder to draw from that battery first...and according to the manual once that battery drains down, the other battery seamlessly takes over. I'll confirm this through testing later.
First are a couple of photos that show the menu selections for choosing which battery you want as main. In this case I've selected the internal Li-Ion battery.
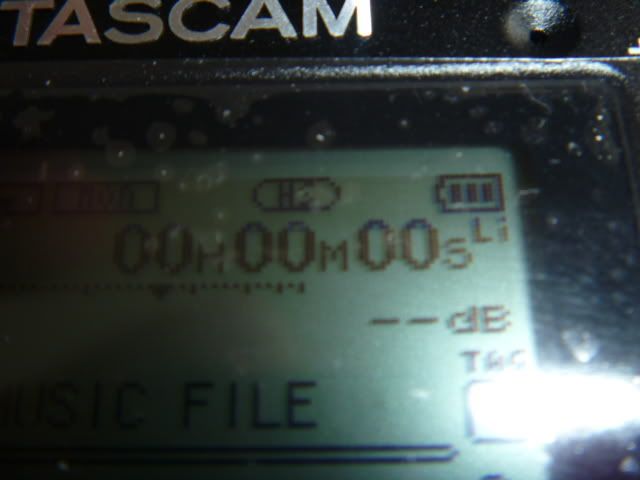
A nice feature is that the main display tells you which battery is being used at any given time...see the upper right corner of the display.
Then I switched and selected the AA's as main.
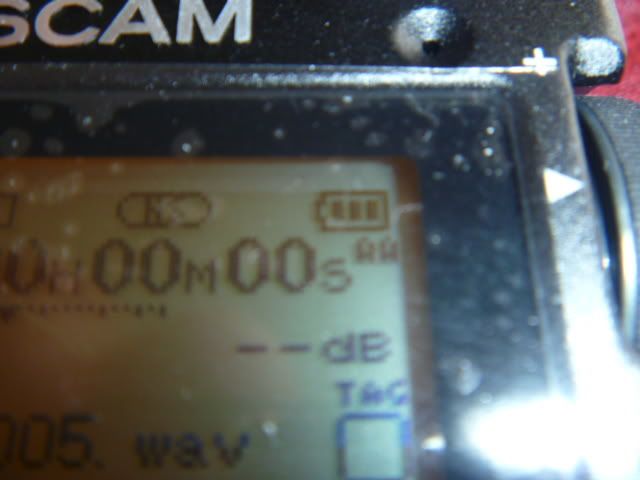
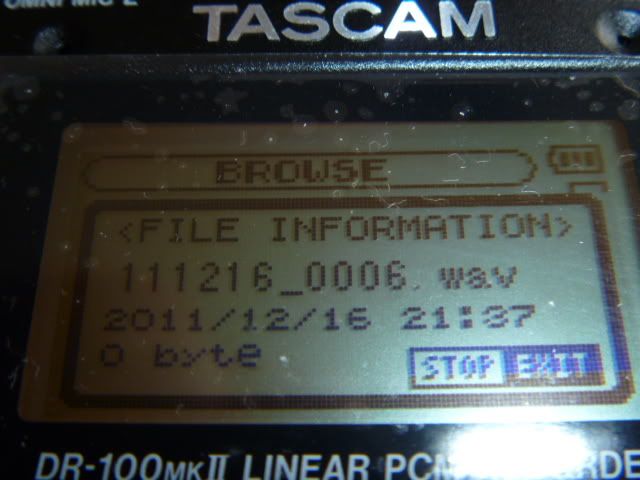
OK, one thing that's somewhat confusing about the manual is that it indicates that you can hot swap a low battery as long as that battery is NOT selected as the main battery. It indicates that you'll lose your recording. So, my immediate concern is what EXACTLY happens to the recording in this case. Is it saved intact? Is it saved at all? Is it corrupted? To test this, I simply removed all power from the unit while I was recording through the internals. The result, which you can see from the sequence shown below is that the file is corrupt, but not lost.
(Having some experience with this issue after owning an MT2496, it appears to me that this is the same situation as MT2496 corrupt files. I've fixed many MT2496 files using the handy Homegrown WAV Header fix tool linked below).
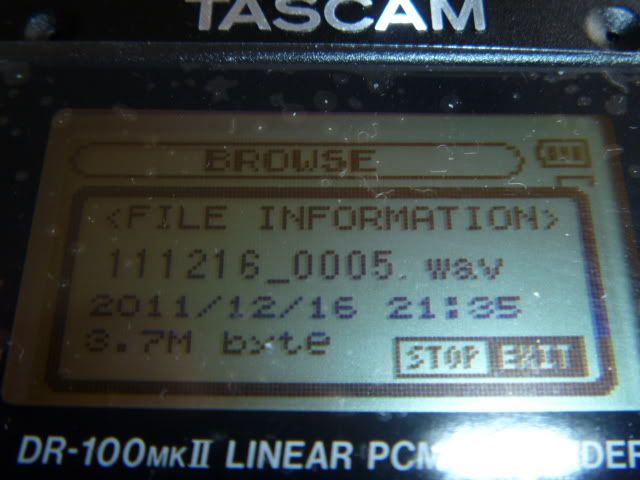
http://taperssection.com/index.php?topic=72936.0This first audio file was recorded and stopped normally. Notice the file size is 3.7M. When you press play, the file plays normally.
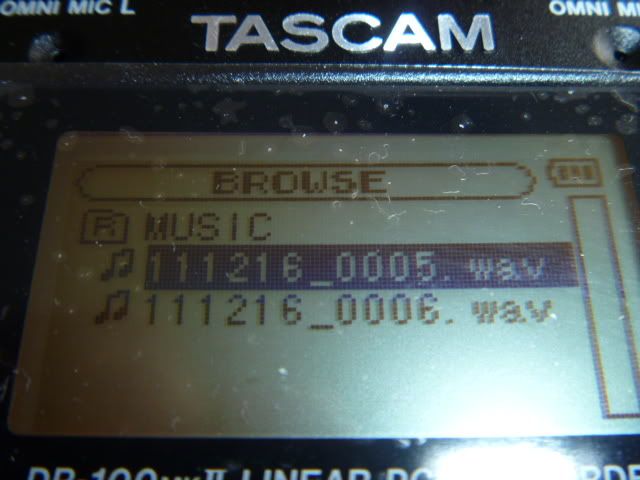
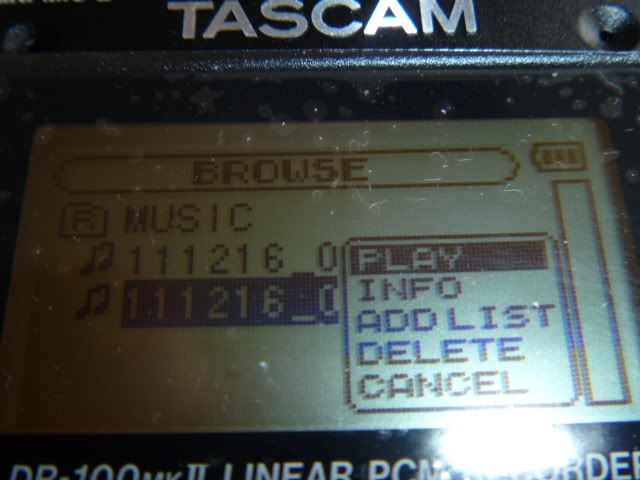
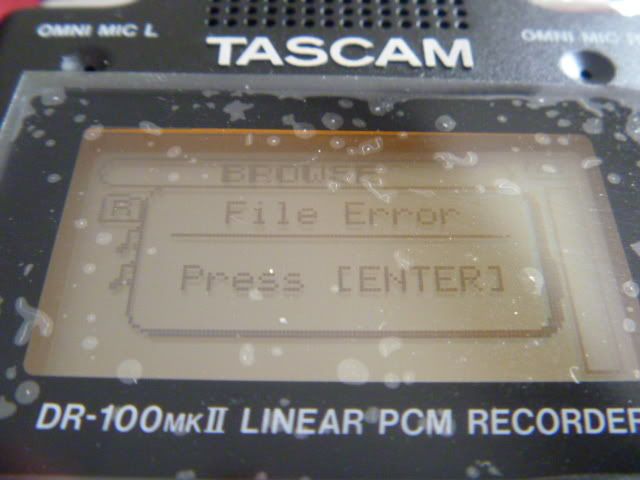
I unplugged all power while recording the second file and you can see, the file still appears up on the menu, but it's file size is 0MB and when you press play, you get an error message.
At first glance, this isn't a very positive finding. However, let's throw this issue on the back burner for now and do some more testing of the power switching capabilities to see how likely it is that we'd ever run into a situation of losing power completely. (I'm still curious to test that statement in the manual about problems if 'main' is selected and then power battery gets removed!)
Testing different battery configurations and automatic switchover in case of sudden disconnect of one of the power supplies:
- AA selected as main, no AA inserted, Li-ion inserted; unit powers on without problem...power is being supplied from Li-ion
- Li-ion selected as main, no Li-ion inserted, AA inserted; unit powers on without program...power is being supplied from AA
- Li-ion selected as main, no li-ion inserted, AA inserted, 5V external battery connected; disconnect external and it switches automatically to being powered from AA
- AA selected as main, no AA inserted, Li-ion inserted, 5V external battery connected; disconnect external and it switches automatically to being power from Li-ion
- AA selected as main, both AA and Li-ion inserted, no external battery connected; remove AA and
UNIT POWERS OFF (no automatic switchover)!

- Li-ion selected as main, both AA and Li-ion inserted, no external battery connected; remove li-ion and it switches automatically to being powered from AA.
- AA selected as main, AC power supply on, no AA or Li-ion battery inserted; unit powers on without any issues
- Li-ion selected as main, AC power supply on, no AA or Li-ion battery inserted; unit powers on without any issues
Summary: Strangely enough, the unit does automatic switchover from any power supply to any other power supply for all situations
EXCEPT FOR ONE...when the AA battery is selected as main and it's removed before it's drained. This is fairly easily resolved procedurally. If you want to swap out the AA before they're dead, you go into the menu and manually swap the main battery from AA to Li-ion. Then you can remove the AA for hot swapping without fear of losing power to the unit.
Even though the above glitch is resolve procedurally, it is a little bit concerning. I can easily see a situation...say during a festival...where you would want to have the li-ion as your emergency power supply, so AA are selected as main because you don't want to drain the Li-ion at all during the weekend...you only want the Li-ion to be used in case you accidently forget to change AA before the AA runs dead.
OK, so now you're in the middle of the festival and your AAs start running low so it's time to swap them out for a fresh pair. You're in the middle of a killer set and you forget to go into the menu to change to Li-ion as main and you pull your batteries out. Boom! You've just lost a recording! (OK maybe it can be recovered using WAVE fixer, but right now that's not looking like a good option to me.)
The question I have from the above is...if every other configuration allows for automatic switchover without the unit powering down, why would it make a difference if the AA's are removed suddenly? The second question is what is the difference between an automatic switchover upon removing the batteries suddently while they have power vs. an automatic switchover after the batteries have drained down (the manual of course says that if the AAs are selected as main and they go dead, there would be an automatic swtichover to the Li-ion.) This is obviously something that I need to test out!!!
Stay Tuned!!
...several hours later...well I set the recorder at main = AA and ran a partially used pair of rechargeables out and it does indeed switchover to the Li-ion without a problem...that's definitely good.
I don't really understand the difference between pulling the AA's out and having the unit shutdown and have the AAs run out and the unit does a switchover, especially when the unit seems to do a swithover with every other permutation of lost power.
Finally, I took out all of the batteries and plugged in the USB cable to see if the unit could be powered via the USB. At first I thought that it couldn't be because as with other recorders, the unit automatically detects that it's connected to the computer via USB and defaults to basically being recognized as a removable drive my your PC. See below.

However, Dan Nolan (spyder9) pointed out that there is a workaround for the above and I confirmed that the DR-100mkII reacts consistently with Dan's experience on the DR-1. In the responses to this review Dan pointed out...
There is a work around. Press Record first, THEN plug in the external USB battery pack. You'll continue to record while charging the Lithium on the fly. No "USB Connect" screen. I perfected this at Wanee a few years ago with my DR-1, which runs the same battery. A simple cheapo USB AA battery pack had that puppy running 11 hours. Hot swapping made easy. NOTE: if you Stop your recording, the "USB Connect" screen will come up, but no fears, your recording will be saved.
RUN TIME TEST I'll start doing a run-time test tonight with a fresh pair of energizer batteries and then tomorrow night I'll run the Li-ion battery down to see what it gets. (I don't currently have a pair of P48 mics, so I'm not going to be able do run time tests with P48 engaged.)
Run Time = 3 1/4 hours (AA Energerzers, P48 off, internal directional mics selected, backlight off)
Run Time = 5 hours (AA Ni-MH Energizer Rechargeables, P48 off, internal directional mics selected, backlight off)
Run Time = 5 1/2 hours (Li-ion, P48 off, internal directional mics selected, backlight off)
MEDIA TEST I only currently own two SD cards, plus the 2gb card that was supplied with the recorder. One card is an 8gb Sandisc, Class 2 and the other card is a 16gb Lexar, Class 4. After testing them out with some quick, basic format, recording and playback checkouts, all three of the cards seem to work fine in the unit.
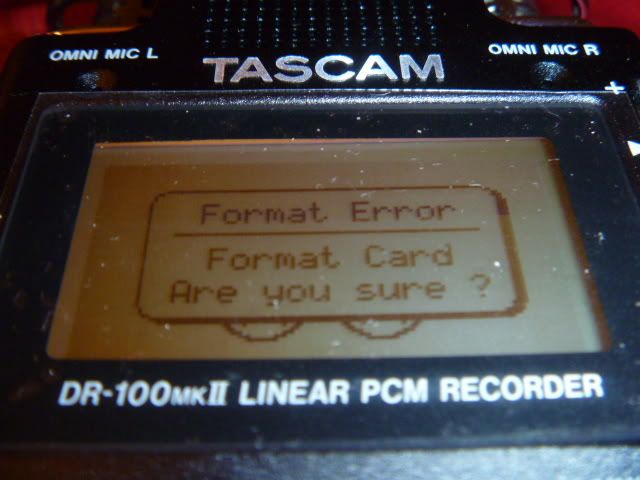
Interesting note, there are two options for formatting the SD cards in the menu; Quick Format and Full Format. Quick format seemed to take only 5 or 10 seconds for either of these cards, but Full Format was another story. At first, I thought there was a problem because the 2gb card was taking an abnormal amount of time to go through the full format, which I figured would take a few minutes. However, checking the manual, it warns that you should plug the unit into AC power before doing a full format. Realizing that the full format may just be a very slow process I re-started the full format on the 2gb card. Wow, it took over 18 minutes to finish a full format. I'm not sure if the time would extrapolate linearly for the larger cards, but safe to say that full format will take a LOOONG time for the larger sized SD cards.
The unit didn't recognize either of the larger cards when I first inserted them...of course they hadn't been formatted in the DR100mkII yet. When you load a card in the unit that isn't formatted in it, it first asks the user if you're sure you want to format the card...see photo below. Press yes and the unit takes 10 seconds or so to do a quick format. Both of my cards were good to go after the quick format, so I'm not really sure at this point what is the advantage of full format over quick format, but quick format seems to be all that's needed.
EDIT on 2011/12/19, 8pm: Gutbucket provided a very nice summary of the difference between quick format and full format, which is copied below from Page 2 of this thread.
Regarding media cards and formatting, I assume this unit will behave similarly to both the DR-680 and DR2d which I use. A couple comments on that that may be helpful-
With the DR-680 and the DR-2d, I’ve found it best to do full formats of the SDHC cards with a computer (formatting as FAT32) since doing that is far, far faster than trying to run a full format using the recorder. I then transfer the card to the recorder, power it up and it will either ask to format, requiring a press of the enter button (and doing a quick format), or it will just ask to write system files to the card, which also requires a press of the enter button. Writing system files does not erase the data on the card, it only adds system files and folders that the Tascam uses.
Important general notes on fast vs full-format (not specific to this recorder)-
Formatting erases the existing data on the card. Actually it’s more complex than that as computer savvy users will already know- A quick format basically erases the file system table of contents and allows the existing data on the card to be overwritten, but it may be possible to retrieve existing data before it has been overwritten by using file retrieval software. A full format completely erases the media, overwriting the existing data and also checking the full media for errors. Data is usually not recoverable after a full format. That applies to most all ‘flash’ recorders that use solid state media cards.
I share multiple SDHC cards between recorders and cameras. The Tascam machines are pickier about formatting and system files than my other recorders and cameras [edit- and will often ask to format a card it does not recognize, where as my Edirol R-44, R-09s, Panasonic and Cannon cameras generally work with any FAT32 formatted card]. To make sure I can use any freashly formatted card in any of my SDHC recorders and cameras, my working procedure for SDHC cards is as follows:
1) Do a full format of the card with a computer (choose FAT32 file system).
2) Put card in DR-680 and power up. DR-680 will ask to format (doing a quick format) and will write folders and system files to the card.
3) Put card in DR2d and power up. DR2d will ask to write its own system file.
4) Put card in the pool of ‘empty and ready to use cards’. Any of my devices will now read and write to the card. A couple cameras will add their own folders and system files the first time a formatted card is used in them, but they don’t specifically ask to do and present a risk of accidental formatting.
Note: The DR-680 is picker than the DR-2d. With a freshly computer formatted card, the DR-680 will require it’s own quick format (erasing anything that may be on the card) while the DR2d usually only requires writing system files, which does not risk erasing other data that is already present. By following the procedure above, I can interchange cards at any time between all of my devices, without having to re-format and loose data. Good pre-festival procedure, but maybe unnecessary if you don’t need the flexibility of swapping cards around.
REVIEW OF MENU SELECTIONSI don't think I'll do a very detailed review of the menu because the DR100mkII basically has all of the same menu features as most other units, but I'll point out a couple of unique features that caught my eye on first run through.
First off, use of the spinwheel and the enter button is easy and intutive for navigating the menu, especially for people that have owned an ipod classic, since the same principle of navigation applies.
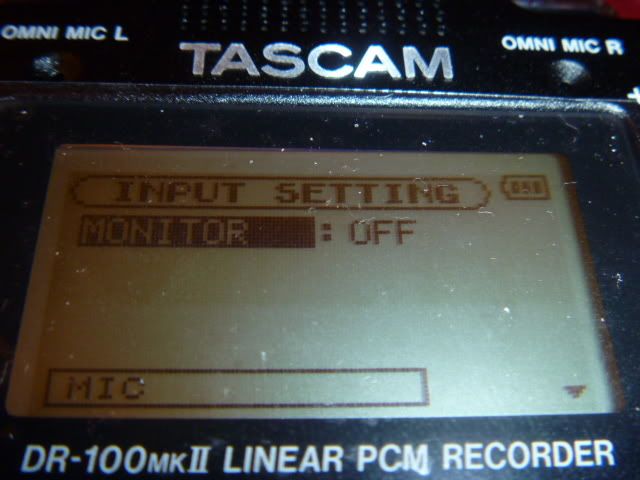
One setting that's kinda neat is the INPUT SETTING menu. There is a selection on that menu that allows you to toggle the monitor on/off. (See photo below.) In the ON position, the recorder is continuously monitoring throught the headphones, regardless of whether or not the unit is recording to the SD card. The feature also exists on the Sony D50...I'm hard of hearing and I actually found this to be a cool way to amplify the sound of the room you're in so you can hear things louder. For example, I once happened to have the D50 with me in the car and brought it into our church and I was able to hear the ministers sermon ALOT better just by using the D50 to amp everything up. It's a kinda handy little option!
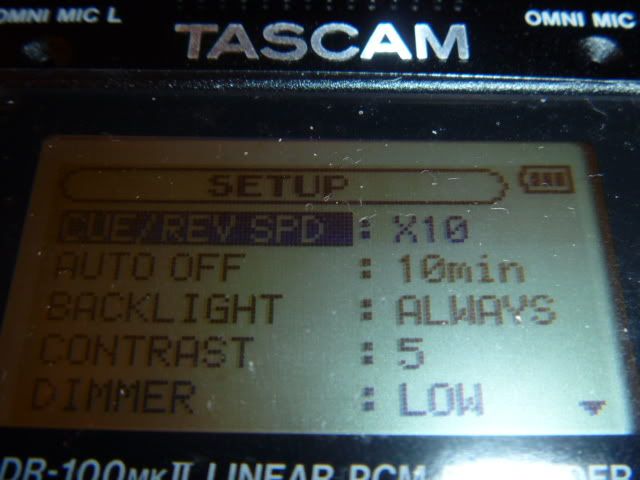
Another interesting feature that I haven't seen on any other recorder is that there's a menu selectable cue speed control. You can select faster or slower cue speeds, depending on your preference from the menu up to a peak cue of x10 speed.
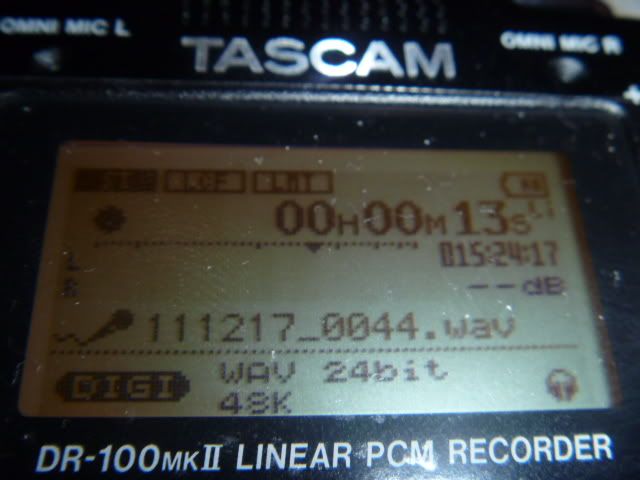
 DIGITAL INPUT TEST
Starting to get into the nitty gritty. One of the main reasons I bought this unit was because it has a digital input. On taperssection we have discussed for several years now the need for a digital input on a reliable handheld recorder in the sub-$500 range. Most people that didn't have a minimum of $600 for a PMD-661 had to suffer with the quirks and frustrations of the MicroTrack 2496 or MTII. Both are terrible recorders and I know at least one person that gave up taping because they stopped enjoying shows after getting into it and the ONLY reason they gave up taping was the frustration of dealing with a Microtracker...they determined that recording wasn't worth losing the fun of the show!! That just never happen to a brethren!
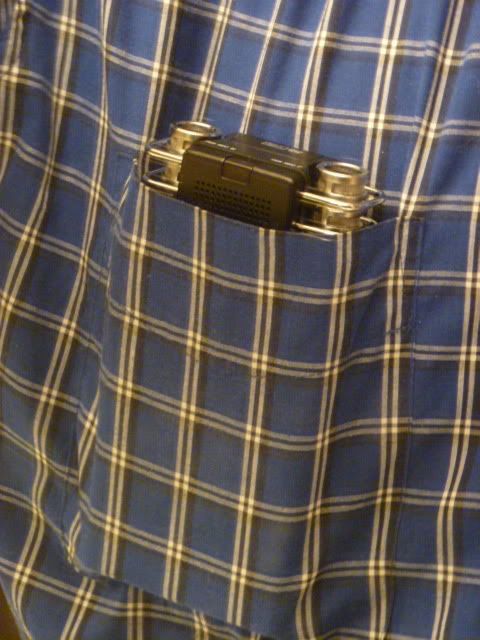
I think the DR100mkII is a real step in the right direction. At $330, it bridges the gap between the MT line of recorder and the $600 required at the next step for a PMD-661. Not that price is the only issue, the size of this unit, while larger than most handhelds, still is small enough that it can fit in a shirt pocket.
As far as testing...I have a mini-me that I am using to test the digital input on the unit. The mini-me has both AES/EBU and SPDIF outputs, so I first hooked up my mini-me through the digital SPDIF output. The DR-100mkII locked in quickly at both 16bit and 24bit and at both 44.1 and 48khz sampling frequencies.
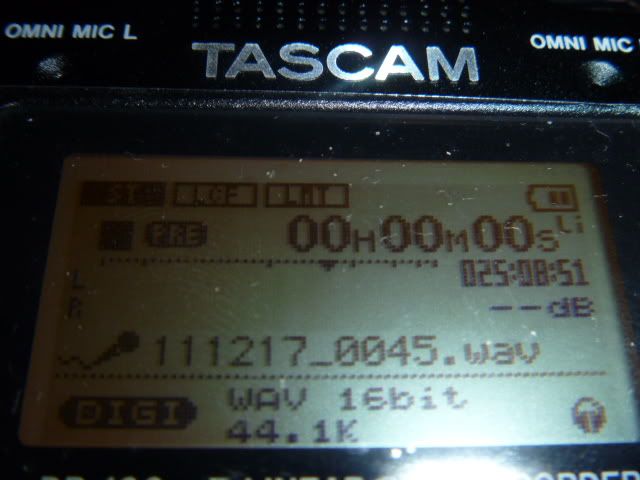
I did do a test of the unit through the AES/EBU output of the mini-me and the unit locked in at the 24/44.1 setting. Strangely, it would
NOT lock on the mini-me AES/EBU output signal when the settings were 16/44.1, 16/48, or 24/48. However, the manual says that this unit outputs SPDIF, so apparently this isn't going to be a unit for people that need to interface with AES/EBU connectors.
I'm not sure if this is a big deal for some people. I think most people needing the digital input would be needing to use the SPDIF standard, so obviously for them this unit should be OK
This is the message returned by the DR100mkII when the Digital Input will not lock...
 LI-ION BATTERY RECHARGE TEST
It took the battery 4hr, 20 minutes to recharge from fully dead until the recharge light goes out. This was done recharging the battery via USB cable.
FILE SPLIT TESTTonight I checked to see if there is any dropped out music between file splits. The unit allows you to set file sizes really small, so for test purposes I set the unit at the smallest size, then I recorded a Panic song into the Line In 2 jack. First I recorded the song straight up without any split and then I recorded the same section of the song right before the unit got to the file split point and let the file split position itself in the same portion of the song I'd recorded straight through before.
I then loaded both samples into Audition to analyze the results. First I opened the song with no splits. Then I laid the second recording down parallel to the first. If there was any dropped music from the second recording, it would show up in a comparison between the two because there would be some lost music at the gap split.
Results were totally positive...I zoomed way in and the two recordings absolutely paralleled each other and I couldn't see even the slightest dropping of music between track splits down to at least a hundredths of a second.
So, I'm calling this unit's track splitting capability completely seamless...NICE!
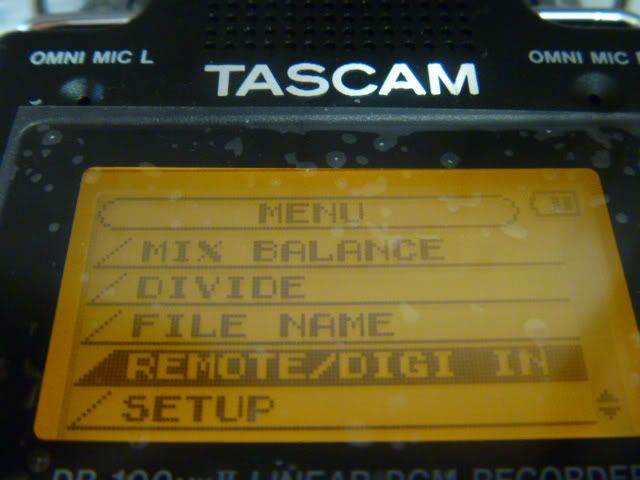
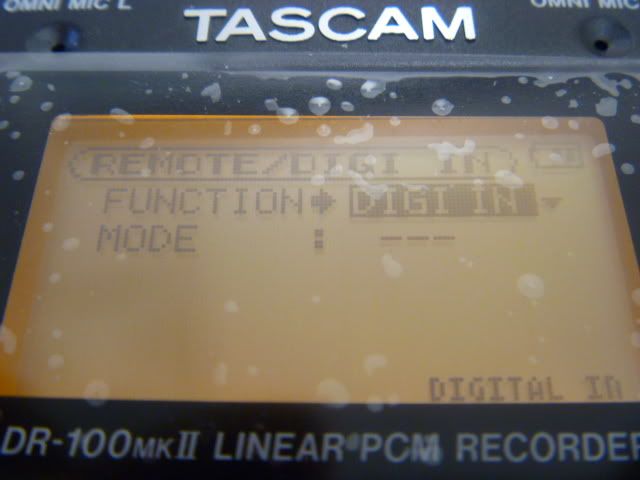
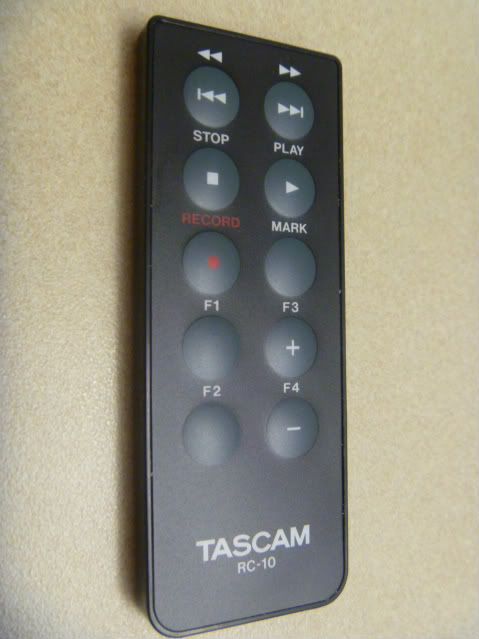
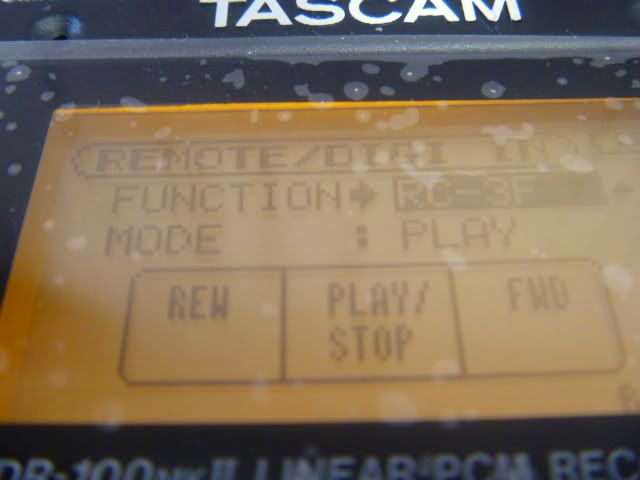
TESTING/REVIEWING THE REMOTE CONTROLThe remote control is active with the unit Remote/Deigi-In selection set to either Digi-In or RC-10, as shown below.

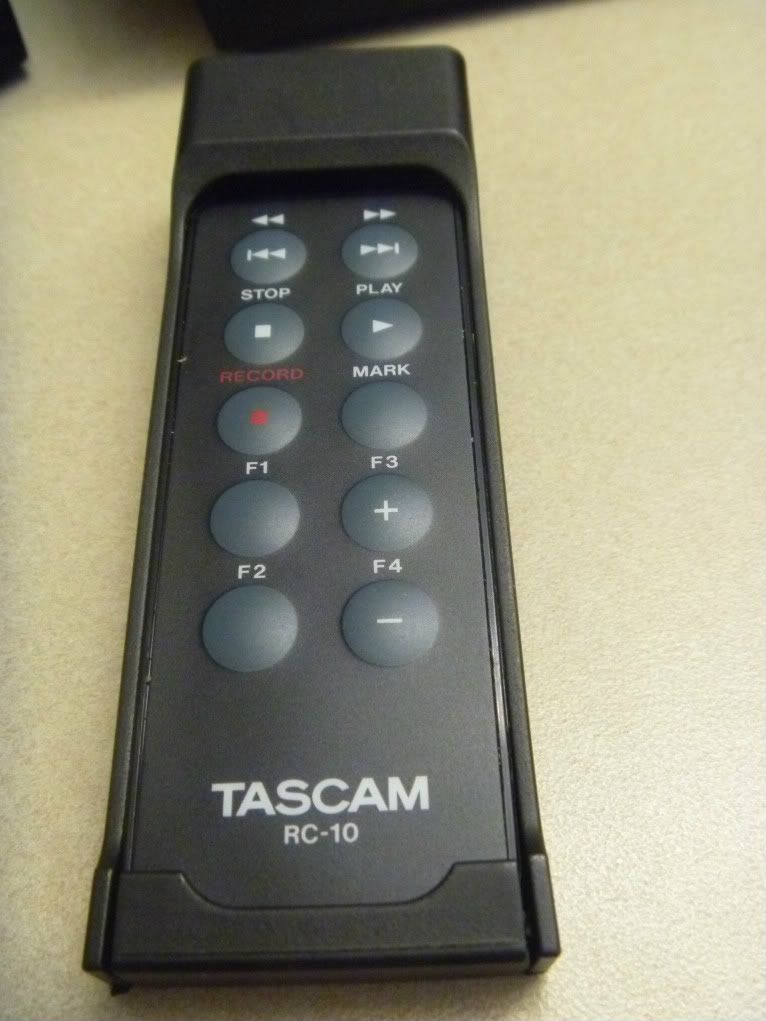
The remote control for this is shown in the the following photo. The basic functions are covered. There are some function buttons (F1, F2, etc) that perform some ancillary functions, but really not that big a deal to worry about. If you really want to know what all the buttons do, PM me or check the manual.
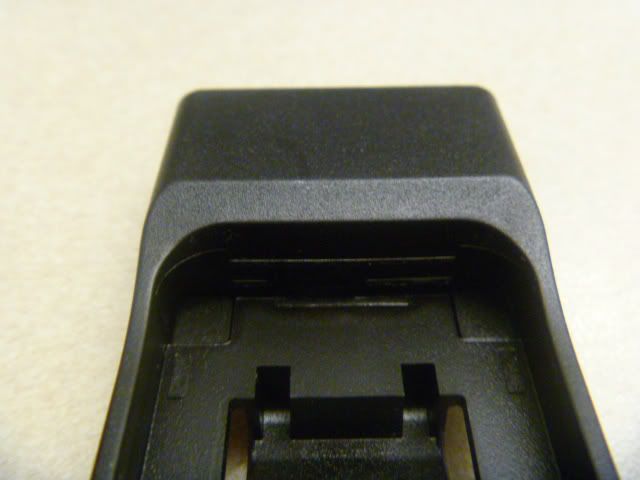
In order to change this to being a wired remote, you simply take the harness and slide the wireless remote into the harness and snap it in place. Note that the unit cannot be operated from the remote once the wireless is secured in the harness if the wireless is not plugged into the 2.5mm jack. You can't really see all that well in one of the pictures, but the harness is more than just a plastic holder...it has an internal remote sensor in it that 'see's' the IR from the wireless and translates that for transmission over the cable.
IMPORTANT NOTE:
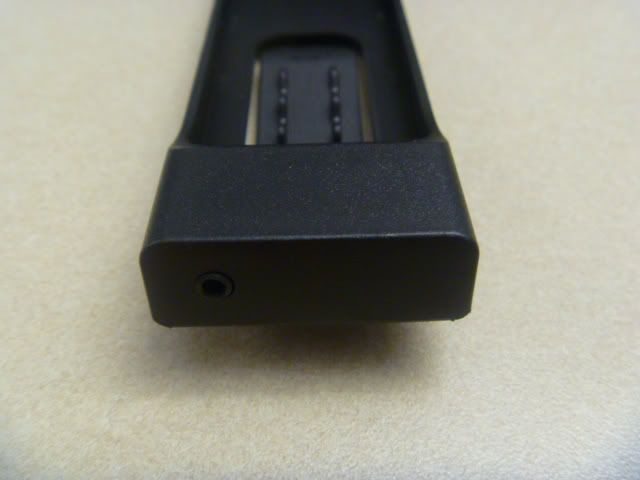
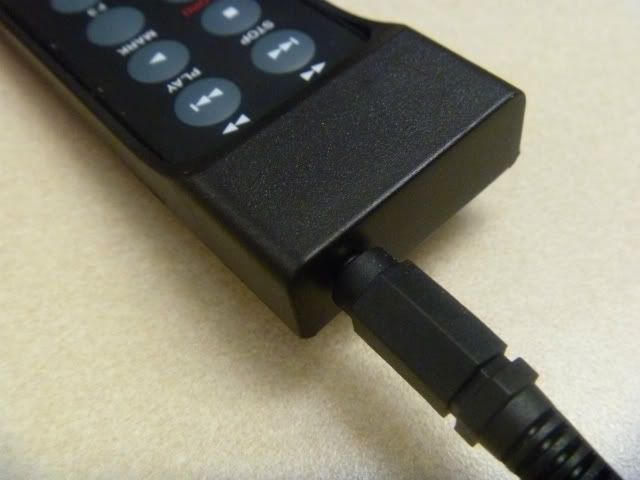
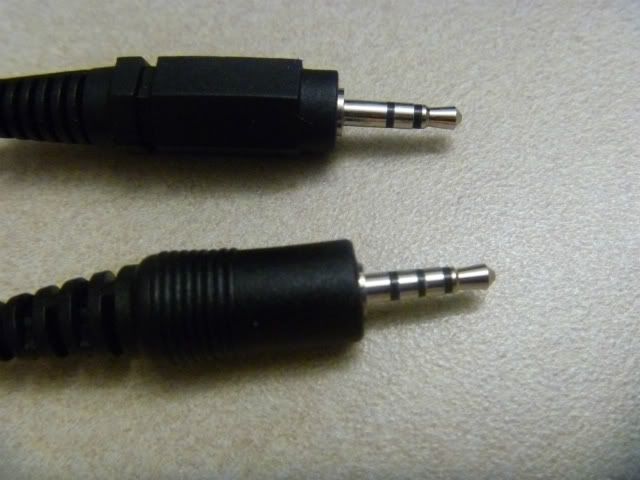
Please look closely at the following picture. You'll see two 2.5mm cable connectors. The top connector is the connector for the wired remote cable and the bottom is the connector for the digital input cable. Second photo shows more clear which is which. The important thing to note is that these two connectors are different. The top connector has one fewer barrel connections than the bottom connector. This will be something to note if anyone wants to make any custom cables for this unit.
Functionally, here are some basic observations/findings when checking out the functionality of the remote:
- Wirelessly, the remote works with up to 9 feet of free air space between the remote and the unit.
- The remote does not function wirelessly once inserted into the harness.
- Remote functions (both wireless and wired) are NOT disabled or frozen when the hold switch is engaged.
- The remote (both wireless and wired) is functional when digi-in is selected.
- The remote is disabled completely by selecting the footswitch (which is an optional accessory) from the menu (see photo below).
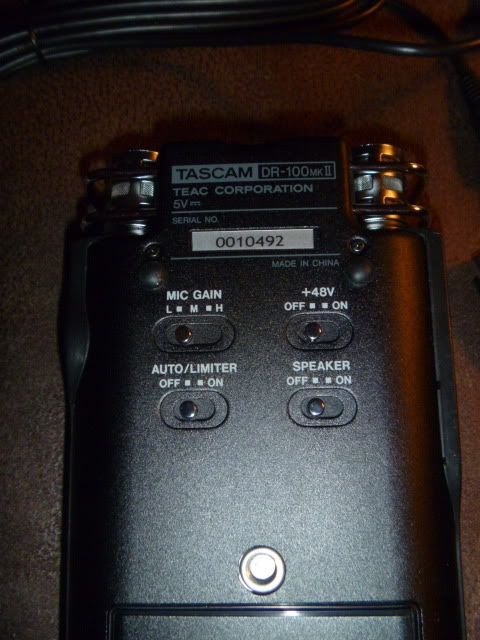
 USING THE LOW/MID/HIGH GAIN SWITCH
The switch on the back (see photo below) seems to be a handy feature that's unique to this unit in the handheld market. This L/M/H switch is used to adjust the gain scale on the mic-in (XLR inputs) depending on the level of input sound being recorded. The switch seems to me to be similar to the menu selectable low/high scale on the Sound Devices SD-7XX machines. The switch is a rough adjustment while the level control knob allows for fine adjustment. Another analogy is that the L/M/H switch is analogous to the step gain control on a V3 while the level knob is analogous to the trim control on the V3.
Here's what the manual says...
L (LOW)
Use to record band performance and other loud sounds of close sound sources.
M (MID)
Use to record acoustic guitars and wind instruments, for example.
H (HIGH)
Use to record meetings, voices and other quiet sounds or distant sound sources.
The manual also says...
NOTE:
When the MIC GAIN switch is set to M (MID), if the level meters do not extend very far even as the INPUT volume setting approaches 10, set the MIC GAIN to H (HIGH). On the other hand, if the level meters stay extended even as the INPUT volume setting approaches 0, set the MIC GAIN to L (LOW).
Couldn't have said it better myself!
TESTING THE LOW/MID/HIGH GAIN SWITCH AND THE LEVEL CONTROLI was interested to determine the amount of gain added when the gain switch went from the L to the M setting and then again from the M to the H setting. So, after giving this some thought, I figured out a test that I think determined this fairly well. I went downstairs in my basement where it's fairly quiet and the background is fairly uniform and without miscellaneous noises or sounds. I recorded the background at each setting and then loaded the results into Audition to see electronically what amount of gain gets added at each step.
The first thing I found out is that the L/M/H switch is disabled when the Mic In/Line In switch is moved into the Line-In position. I really like this feature because I don't want to be adding any gain from the unit when I'm using an external preamp. Nice.
Moving the XLR switch over to Mic In, I ran the swich through each of the settings while recording the results. The following were my results...
L to M - +25db
M to H - +25db
I also tested the amount of gain that is added by the gain dial.
First, as expected, in spite of the fact that the L/M/H switch is disabled in Line In position, the gain control controls the levels in with the XLR switch in either Mic In or Line In.
To conduct this test, I set the XLR switch to Mic In and set the L/M/H switch to M. Then I ran the level control through the full range from 0 to 10 and then back to zero again.
The results of this test are that the level control has
30db of range.
So, interestingly the L/M/H switch provides 25db of gain with each step increase and the level knob provides 30db of gain when running it from 0 through 10. This provides a nice coverage range, where the L/M/H switch is used for rough setting the gain scale needed for the type of sounds being recorded, while the level control is used for fine tuning.

