Become a Site Supporter and Never see Ads again!

Author Topic: Oddball microphone techniques - part 1  (Read 165781 times)

0 Members and 2 Guests are viewing this topic.

Offline Gutbucket

  • record > listen > revise technique
  • Trade Count: (15)
  • Needs to get out more...
  • *****
  • Posts: 15683
  • Gender: Male
  • "Better to love music than respect it" ~Stravinsky
Re: Oddball microphone techniques
« Reply #285 on: October 26, 2017, 11:45:04 AM »
A single figure-8 in the center should work, but not in the same way. Probably fine if there is minimal ambient sound in back and you are limited to 3 channels. 

I've considered trying that, partly as a way of getting the narrowest front directivity possible with maximum rejection to either side.  But my main concern is that it gives up the exclusive forward focused directivity that a forward-facing center mic provides and which I feel is such a valuable core component in these setups.  Over the years of playing with this, I've moved from omni (sphere-mounted) to cardioid to supercardioid as the forward-facing center microphone to get the most forward focused directivity possible, other than moving to a shotgun mic.  After all, this is about distance recording even when I have it setup FOB in the center of the action or closer, and that center mic is the only one I'm pointing directly towards the stage.  Its forward focus excluding audience and room as much as possible is important.  It functions as sort of a "direct SBD-substitute" in the array.   Even with the 6-mic array, that center mic is the only one actually facing forward! (Although with all microphones basically spaced along a line, the sideways facing mics and wide omnis all contribute to the overall forward directivity of the entire setup in a "phased-array" sense)

The problem is that a figure 8 in that position is equally sensitive front and rear, you give up the ability to adjust how much rear facing stuff gets picked up, and the rear-facing information cannot be not spread out and decorrelated.  It's inseparable from the front focus stuff and imposed upon it.

If one has a figure 8 available, I'd use it in the center mounted coincidently with another microphone to form a Mid/Side pair in one of two ways-
1) Mount it facing sideways along with a forward facing directional microphone as mentioned previously, to provide center blend control between the wide pair and the center mic.  Center mic should be a cardioid, supercard, or a shotgun.  I'd feel somewhat less hesitant to use a shotgun mic in the center if I had an 8 coincident with it, due to this blend advantage.  That's because a shotgun is tighter-focused at high frequencies (good here, but blend may become more important), commonly has off-axis coloration issues (mitigated in this case by the other mics in the array providing ambient content and hiding those anomalies), and likely has a significantly different timbre than the wide pair, so I suspect making it blendable via Mid/Side would be especially advantageous.

2) Do it as I think you are suggesting voltronic, by mounting it facing forward, coincident with an omni (you need the omni to make this work).  You then have a "Strauss Packet" omni/bi-directional arrangement and can dial in whatever forward-facing and rear-facing directional patterns you like.  It acts as a front/back facing Mid/Side pair so you can choose the directivity of both the front facing virtual microphone and a rear facing one.  If versed in Mid/Side decoding, you could even use a different Mid/Side ratio for each and dial in whatever works best, say a supercard-ish forward-facing pattern (for maximum forward focus) and a cardioid rear-facing pattern (for maximum front rejection in the rear facing microphone).  Disadvantages of doing that compared to using two directional mics is that you need to Mid/Side decode it, a figure-8 is more wind noise sensitive, and there is no spacing between the front and rear facing microphones.  Jury is still out on how much front/back spacing matters.

I can do that in a similar way by putting the TetraMic in the center, which makes for an attractive variant.  I tried this years ago in my initial tests with the TetraMic between spaced omnis, before I started using it pretty much exclusively on-stage, and now think I may to revisit it as a second main rig.  Would make for a 3-point arrangement with the TetraMic between spaced omnis.  Need four recording channels for the TetraMic, so even through there are only three mic positions that's 6 recorder channels including the spaced omnis.  The TetraMic is ambisonic (3D Mid/Side basically - essentially three virtual figure-8's + omni) so I could dial in a number of virtual coincident mics adjusting the pattern and angle to whatever works best aferwards- say a narrow-angled forward-facing supercardioid X/Y pair, and a wider-angled rear-facing pair.  This will be a good test of how much spacing matters, as my primary rig has the four spaced supercardioid pointing in the cardinal directions.

« Last Edit: October 26, 2017, 02:31:34 PM by Gutbucket »
musical volition > vibrations > voltages > numeric values > voltages > vibrations> virtual teleportation time-machine experience
Better recording made easy - >>Improved PAS table<< | Made excellent- >>click here to download the Oddball Microphone Technique illustrated PDF booklet<< (note: This is a 1st draft, now several years old and in need of revision!  Stay tuned)

Offline heathen

  • Trade Count: (23)
  • Needs to get out more...
  • *****
  • Posts: 3528
Re: Oddball microphone techniques
« Reply #286 on: October 26, 2017, 01:36:00 PM »
I can do that in a similar way by putting the TetraMic in the center, which makes for an attractive variant.  I tried this years ago in my initial tests with the TetraMic between spaced omnis, before I started using it pretty much exclusively on-stage, and now think I may to revisit it as a second main rig.  Would make for a 3-point arrangement with the TetraMic between spaced omnis.  Need four channels for the TetraMic, so even through there are only three mic positions that's 6 recorded channels.  The TetraMic is ambisonic (3D Mid/Side basically - essentially three virtual figure-8's + omni) so I could dial in a number of virtual coincident mics- say a narrow-angled forward-facing supercardioid X/Y pair, and a wider-angled rear facing pair.  This will be a good test of how much spacing matters, as my primary rig has the four spaced supercardioid pointing in the cardinal directions.

To this point, could you duplicate the B-format TetraMic tracks and make a separate virtual coincident configuration for the rear?  So basically, you'd create your virtual pattern that faces forward, then do it again for the rear?

Forgive me if this is an idiotic question...I'm way out of my depth here but can't resist the curiosity.
Mics: AT4050ST | AT4031 | AT853 (C/SC) | Line Audio CM3 | Sennheiser e614 | Sennheiser MKE2 | DPA 4061 Pre: CA9200 Decks: Zoom F8 | Roland R-05

Offline Gutbucket

  • record > listen > revise technique
  • Trade Count: (15)
  • Needs to get out more...
  • *****
  • Posts: 15683
  • Gender: Male
  • "Better to love music than respect it" ~Stravinsky
Re: Oddball microphone techniques
« Reply #287 on: October 26, 2017, 02:55:40 PM »
Yes, exactly.  That's basically what I just described.  You can derive as many virtual mics as you like pointing in any direction from that one point in space.  Diminishing returns beyond 4 virtual mics, due to all of them being coincident in one point in space (plays into the "how much does spacing matter" question).  But no more than that is needed for this.  Most often I'm just deriving a single stereo pair.  In this case I could make a single forward facing mic and rear facing mic to emulate the setups I'be been talking about, but might as well turn those single and rear facing mics into stereo pairs.

There are different ways to convert the native 4-channel A-format from the mic to universal Ambisonic B-format or directly to usable virtual microphone outputs.  No need to duplicate B-format tracks to do that.  I run the A-format through a conversion program which allows me to set a microphone angle (pointing in any direction) and pattern (any first order pattern from omni through bi-directional) for any number of virtual microphone outputs.  That program outputs those virtual microphones to individual or stereo files which I then use in the mixdown.  This bypasses the need to convert to B-format first that way, although that format is best for archiving the files.  Alternately there are VST plugins which work within your mixing software.
musical volition > vibrations > voltages > numeric values > voltages > vibrations> virtual teleportation time-machine experience
Better recording made easy - >>Improved PAS table<< | Made excellent- >>click here to download the Oddball Microphone Technique illustrated PDF booklet<< (note: This is a 1st draft, now several years old and in need of revision!  Stay tuned)

Offline heathen

  • Trade Count: (23)
  • Needs to get out more...
  • *****
  • Posts: 3528
Re: Oddball microphone techniques
« Reply #288 on: October 26, 2017, 03:02:00 PM »
Figures that I was being boneheaded.   :facepalm:  I was locked into thinking about converting B format to just a stereo pair...but of course you're correct that it's not that limited! 
Mics: AT4050ST | AT4031 | AT853 (C/SC) | Line Audio CM3 | Sennheiser e614 | Sennheiser MKE2 | DPA 4061 Pre: CA9200 Decks: Zoom F8 | Roland R-05

Offline thatjackelliott

  • Trade Count: (0)
  • Taperssection Regular
  • **
  • Posts: 77
Re: Oddball microphone techniques
« Reply #289 on: October 26, 2017, 03:23:04 PM »
Well, this is interesting. Gutbucket, in my music festivals stage-lip setups, where mono-compatibility is paramount, and I'm using a Mid-Side (forward-pointing hypocard mid and sideways-pointed figure-8) arrangement augmented by a direct sound board feed, could this oddball rear-facing directional mic technique be of benefit? I'd like to try in next Summer Festival.

I have up to six mic inputs available, but need to do the mixing in real time. I dematrix (or is it matrix?) the Side mic discretely by splitting the its signal into two paths, flipping polarity on one with an inline xlr polarity-swapping adapter, putting those into the mix with pans hard left and right -- a standard method. I then have level controls for soundboard, mid, and left/right (ganged). Can your rear-mic / mid mic matrixing trick be used in real time with a similar wiring trick?

Offline Gutbucket

  • record > listen > revise technique
  • Trade Count: (15)
  • Needs to get out more...
  • *****
  • Posts: 15683
  • Gender: Male
  • "Better to love music than respect it" ~Stravinsky
Re: Oddball microphone techniques
« Reply #290 on: October 26, 2017, 05:31:24 PM »
Quote
  I then have level controls for soundboard, mid, and left/right (ganged).

The rear-mic / forward-mic matrixing trick I'm doing is pretty much the same thing you are doing.  It just substitutes the rear-facing microphone for a bi-directional Side microphone.  In either case the output of that channel is routed Left/Right and polarity-inverted in one channel in the mix, and will null when summed to mono, cancelling out its contribution.

Sure, you could likewise use an audience facing microphone in place of the sideways-facing figure-8.  You'd get more audience reaction and sense of ambient depth in the stereo mix rather than the Left/Right stereoization you get from the figure-8 in your stereo mix.  And that additional audience reaction and ambient depth would be absent in the mono FM feed, just as the stereoization provided by the Side mic goes absent in the mono FM feeed with your current arrangement.

Currently you select how much audience sound you get in both the stereo and mono version by choice of mid pattern.  You used an omni and the audience level balance should remain about the same in the stereo an mono versions.  If you want a less audience, yet want what audience you do get to remain the same level in both the stereo and mono outputs, stick with your current setup and switch to a sub-cardiod or cardioid Mid.

« Last Edit: October 26, 2017, 07:10:03 PM by Gutbucket »
musical volition > vibrations > voltages > numeric values > voltages > vibrations> virtual teleportation time-machine experience
Better recording made easy - >>Improved PAS table<< | Made excellent- >>click here to download the Oddball Microphone Technique illustrated PDF booklet<< (note: This is a 1st draft, now several years old and in need of revision!  Stay tuned)

Offline kuba e

  • Trade Count: (1)
  • Taperssection Member
  • ***
  • Posts: 489
  • Gender: Male
Re: Oddball microphone techniques
« Reply #291 on: October 26, 2017, 05:47:31 PM »
I just ran the front and rear facing center directional channels thorough a Mid/Side decoder.  Forward facing channel as Mid, rear facing as Side.  Dialed in whatever width works best by ear.  Works great! 

This (or a narrow x/y center mic configuration) is what I suggest to most folks do who want to try this stuff-
Most 4 channel recorders have built-in Mid/Side decoders.  Record the front and rear facing mics to an adjacent channel pair on the recorder such that the front facing center mic will serve as the Mid channel and the rear facing one the Side channel.  Listen right off the recorder, balance playback levels of the wide-spaced pair alone first with the center channels muted.  Then unmute the center channels and switch in the Mid/Side decoder with it adjusted to 100% Mid / 0% Side and bring up the Mid/Side level until it balances appropriately with the wide mics.  What you have is the basic configuration of a wide spaced pair plus a center facing directional mic. The basic 3-microphone configuration providing the aforementioned advantages with lots of after the fact adjustability.

Next mute the wide-spaced pair and play with the Mid/Side width control.  As your bring up the rear-facing Side channel you 'pseudo-stereoize' the monophonic forward facing center with rear-facing audience reaction and hall ambience.  Find a nice sounding ratio setting.  Notice that this is not stereo in a Left/Right directional imaging sense.  There is no pinpoint imaging, there isn't even fuzzy left/right imaging, but an ability to make the sound either more direct and center-focused or more broadly diffuse and ambient.  Cool.

Okay, now note your preferred Mid/Side ratio setting, revert back to 100% Mid, and unmute the wide pair.  Bring up the center again to balance well with the wide mics like we did originally.  Notice that you now have Left/Right stereo again.  Mentally compare that to the mid/side pseudo-stereo.  Now the kicker- slowly adjust the Mid/Side ratio away from 100% Mid.  What you have essentially is a blend control between center and sides which does not reduce image width as it is increased like a further increase in Mid level will do.  It affects the smoothness of the blend between across the front between center and sides.  It simultaneously acts as a sort of depth-control going from up front and flatter (all Mid) to very deep and overly ambient (all Side).  Find the best compromise setting.

Note that the preferred setting is likely to be less wide than when listening to the Mid/Side pair alone.  You only need a little Side as you are getting sufficient stereo interest (and difference information) from the wide mics, but that little bit goes a long way.

I love this.  I've been going back through my four-channel LRCB recordings (Left/Right/Center/Back) and listening this way.  Its relatively simple, easy to do and fantastic sounding.

Gutbucket, thank you, it is great. Do you think we can use this configuration even in a small clubs with good acoustics or is this method only for outdoors and big halls?

I also would like to ask if the forward and rear microphones must be coincident? If the  forward and rear microphones are spaced, can we neglect the comb filtering in Mid-Side mixing? Or is there need for minimal spacing?
« Last Edit: October 26, 2017, 05:49:47 PM by kuba e »

Offline Gutbucket

  • record > listen > revise technique
  • Trade Count: (15)
  • Needs to get out more...
  • *****
  • Posts: 15683
  • Gender: Male
  • "Better to love music than respect it" ~Stravinsky
Re: Oddball microphone techniques
« Reply #292 on: October 26, 2017, 06:05:48 PM »
Sure, it can work in small clubs.  And no the mics don't need to be coincident.  Mine aren't. In the rigs I've talked about here I have about a 12" to 15" spacing between the front and rear facing mics.  That could probably be less without issue.  As mentioned I'm not sure if coincident would be quite as good, but front/back spacing isn't nearly as important as left/right spacing.  It works great on my stealth recordings made with 4 baffled omnis pointing in each direction. Front/Back separation is probably 8" in that case, left/right about 20", but the omnis are made directional by the baffling so the narrower left/right spacing works fine. Part of the coolness is you dial in as much rear mic as is appropriate using the width control. If you want none in there no problem, but even in small clubs I usually want some.
musical volition > vibrations > voltages > numeric values > voltages > vibrations> virtual teleportation time-machine experience
Better recording made easy - >>Improved PAS table<< | Made excellent- >>click here to download the Oddball Microphone Technique illustrated PDF booklet<< (note: This is a 1st draft, now several years old and in need of revision!  Stay tuned)

Offline Gutbucket

  • record > listen > revise technique
  • Trade Count: (15)
  • Needs to get out more...
  • *****
  • Posts: 15683
  • Gender: Male
  • "Better to love music than respect it" ~Stravinsky
Re: Oddball microphone techniques
« Reply #293 on: October 26, 2017, 06:26:42 PM »
Perhaps the multichannel systems developed for surround ambiance could be adapted to music recording.  The 8-channel Schoeps ORTF-3D setup certainly looks like a good candidate, but I imagine the typical taper doesn't roll up with an $18k+ mic setup!

[edit] ^ except Mike Grace recording Phish at Red Rocks.[/edit]

I can't really image the stretch to recording and reproducing height information as well, except maybe binauraly via headphones. But most folks consider me crazy recording 6 channels for horizontal surround!   I have a few ideas about what I feel would be more productive use of 8 recorded channels and have done a few tests, but still with a playback target of standard 2-channel, or 5 to 7 channel surround playback.  I think I'm reaching the point of diminishing returns now, but I've thought (hoped?) that in the past before moving this far, yet the further additions were always too compelling to dismiss once I figured out how to take advantage of them.

I suppose if virtual binarual 3-D playback really takes hold and these kind of setup become available at reasonable cost in easy to use formats - plug a future low-cost ORTF-3D blimp competitor into your phone or something.  But outside of the film and TV world where these tools are justified professionally, its hard to sell a quality system like the Schoeps ORTF-3D on the consumer market, when a smaller, more compact, far less costly and complex systems are available, even if the results aren't truly comparable.  Small, low-cost and simple wins over quality most every time in the consumer world.  People generally want something they can just plug in or stream to their phone.  Convenience trumps quality.

But even if Schoeps ORTF-3D is totally over the top for tapers, you raise an interesting point.  8-channel ORTF-3D is basically two 4-channel ORTF-surround setups, one angled down, the other up.  In turn, ORTF-surround is basically two back-to-back standard 2-channel ORTF setups.  It's a straight geometric progression from 1D to 2D to 3D.  Similarly IRT-cross is nothing more than two back-to-back DIN setups forming a square.  It could also be extended to an 8-channel 3D cubic array.

Here's the prototype ORTF-3D setup as a cubic array, prior to squashing to something more compact and marketable (notice that it's using two standard IRT-cross mounting bars)-


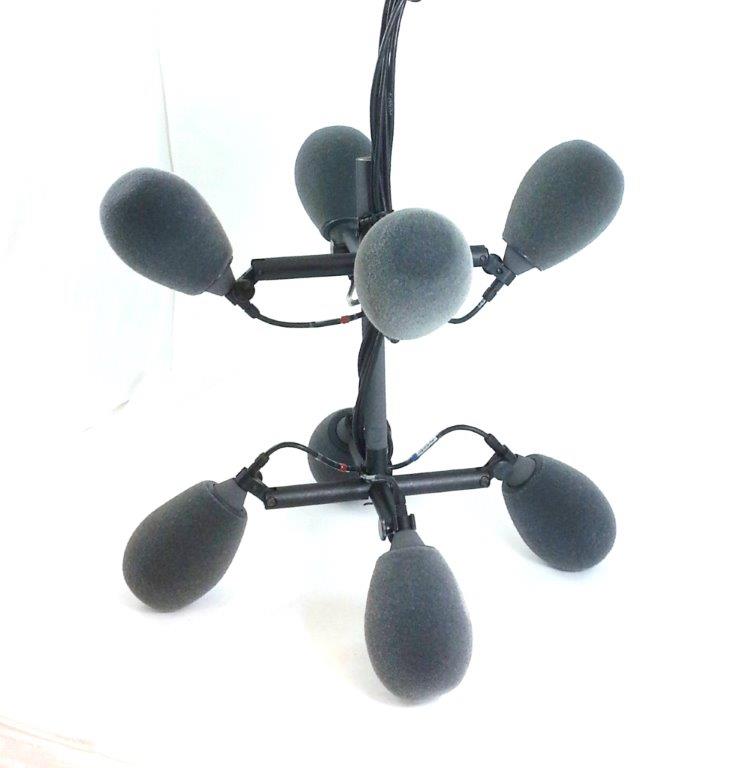
A motivated taper could rig that up with inexpensive AT or CA mics into an F8 at around the same cost of a top-quality 2-channel Schoeps setup.  These setups get costly because of channel count using quality microphones, but as logical extensions of the basic near-spaced 2-channel mic techniques, they aren't difficult to understand.  We now have the recorders available at reasonable cost.

What that prototype really needs for music recording is a SchoepsCMIT shotgun extending forwards!  I joke, but it's true.  That thing takes care of the ambient stuff in a fully open and airy 3-D better than an ambisonic mic can (due to the more optimal spacing).  Mix it with the SBD and or add a forward facing directional mic for the direct sound component to make it more music suitable.

But then you start optimizing for music recording with a preferred axis and that nice symetric cube becomes more and more stretched and distorted- the front mics point further to the sides to work correctly with the added center mic and so as not to not be overly dominated by the direct sound.  You then approach the geometry of music oriented horizontal-surround configurations like Williams MMAD or OCT-surround setups.. or these odd-ball mishmash combinations of all these approaches.


I'm surprised I've not heard of any tapers dabbling in surround by simply pointing a second near-spaced stereo pair backwards behind their favorite forward facing near-spaced setup, especially the DMB tapers a decade back or so who were messing around with 4-channel surround and producing DTS encoded files.  Just clamp a second DIN rig on the same stand facing backwards and run it all into a 4-channel recorder.  No extra gear needed.  Easy entry to quad surround and should be far better than the few DMB DTS surround attempts I've heard with SBD sent to the front speakers and AUD to the surrounds.  If they had SBD, then route that to the center channel if they wanted to extend from quad to 5 channel in an acoustically optimal way, or stick with quad and mix the SBD in with the forward facing near-spaced L/R pair.
musical volition > vibrations > voltages > numeric values > voltages > vibrations> virtual teleportation time-machine experience
Better recording made easy - >>Improved PAS table<< | Made excellent- >>click here to download the Oddball Microphone Technique illustrated PDF booklet<< (note: This is a 1st draft, now several years old and in need of revision!  Stay tuned)

Offline Gutbucket

  • record > listen > revise technique
  • Trade Count: (15)
  • Needs to get out more...
  • *****
  • Posts: 15683
  • Gender: Male
  • "Better to love music than respect it" ~Stravinsky
Re: Oddball microphone techniques
« Reply #294 on: October 26, 2017, 06:47:10 PM »
I have a few ideas about what I feel would be more productive use of 8 recorded channels and have done a few tests, but still with a playback target of standard 2-channel, or 5 to 7 channel surround playback.

Namely, this involves placing front/back facing bi-directionals coincident with the wide-spaced omnis.  I could then do the "strauss packet" Mid/Side thing on each side and have control over front/back direct/ambient balance in each of the spaced omnis.  Split the output to the front and back speakers as appropriate.  That's probably more useful for surround playback than 2-channel, where I could effectively have a pair of wide spaced rear facing cardioids feeding the surrounds which exclude direct sound pickup from the front as much as possible.  That's motivated by the excellence of the wide omnis as surround feeds, except they typically have about 6dB too much direct sound in them to be able to raise the surround level to what would be optimal.  Subsequently I've gone back to using the sphere attachments on the omnis and pointing them rearwards.  Still works fine in the 2-channel mix but doesn't' quite achieve the 6dB difference I'm seeking.

The obvious and simpler answer is to stick with 6 channels and switch to rear-facing wide-spaced subcards instead of omnis. Could do that with the discontinued and now elusive AT 853 subcards.  Anyone have a pair for me?

Practically its very hard to support anything way out there on the ends of the TV antennas except miniature mics.  A miniature light-weight low-voltage figure-8 doesn't exist.

« Last Edit: October 26, 2017, 06:49:08 PM by Gutbucket »
musical volition > vibrations > voltages > numeric values > voltages > vibrations> virtual teleportation time-machine experience
Better recording made easy - >>Improved PAS table<< | Made excellent- >>click here to download the Oddball Microphone Technique illustrated PDF booklet<< (note: This is a 1st draft, now several years old and in need of revision!  Stay tuned)

Offline kuba e

  • Trade Count: (1)
  • Taperssection Member
  • ***
  • Posts: 489
  • Gender: Male
Re: Oddball microphone techniques
« Reply #295 on: October 26, 2017, 07:06:16 PM »
Sure, it can work in small clubs.  And no the mics don't need to be coincident.  Mine aren't. In the rigs I've talked about here I have about a 12" to 15" spacing between the front and rear facing mics.  That could probably be less without issue.  As mentioned I'm not sure if coincident would be quite as good, but front/back spacing isn't nearly as important as left/right spacing.  It works great on my stealth recordings made with 4 baffled omnis pointing in each direction. Front/Back separation is probably 8" in that case, left/right about 20", but the omnis are made directional by the baffling so the narrower left/right spacing works fine. Part of the coolness is you dial in as much rear mic as is appropriate using the width control. If you want none in there no problem, but even in small clubs I usually want some.

Thank you very much, I'm looking forward to trying this. I will write how it will turn out.

Audience recording is so creative field - microphone arrays, stealth four baffled omnis, ortf-3d with shotgun ...The theory that is behind is also very interesting.

Offline thatjackelliott

  • Trade Count: (0)
  • Taperssection Regular
  • **
  • Posts: 77
Re: Oddball microphone techniques
« Reply #296 on: October 26, 2017, 08:36:41 PM »
Quote
  I then have level controls for soundboard, mid, and left/right (ganged).

The rear-mic / forward-mic matrixing trick I'm doing is pretty much the same thing you are doing.  It just substitutes the rear-facing microphone for a bi-directional Side microphone.  In either case the output of that channel is routed Left/Right and polarity-inverted in one channel in the mix, and will null when summed to mono, cancelling out its contribution.

So lemme see now. (Begins to count on fingers.)
  • The mono soundboard feed goes to one fader.
  • The Mid mic goes to a second fader.
Now I can adjust the ratio of dry soundboard and wet stage sound for the mono-compatible signal. Two faders so far.
On to Stereofication:
  • The Side mic is split, one split is polarity-invertered, then into two faders panned hard left&right which are ganged.
Now I have a means to adjust stereo spread without munging the center/mono signal.
That's four faders.
Then, the final frontier of . . . is there a name for this? Magically Delicious Decorrelated Ambience?
  • The Rear-facing mic is treated just like the Side mic: split, invert one side, bang into two ganged channel strips with hard left/right pan.
A grand total of six faders.

Is this accurate? Totally sounds like wiring geek fun.

Offline Gutbucket

  • record > listen > revise technique
  • Trade Count: (15)
  • Needs to get out more...
  • *****
  • Posts: 15683
  • Gender: Male
  • "Better to love music than respect it" ~Stravinsky
Re: Oddball microphone techniques
« Reply #297 on: October 27, 2017, 09:44:06 AM »
^ Shure.  No need to choose one or the other when you can have both.

Quote
The Rear-facing mic is treated just like the Side mic: split, invert one side, bang into two ganged channel strips with hard left/right pan.

Care to go further down the rabbit hole Alice? If you decide you want some of that rear-facing audience stuff in the mono sum, you can unbalance the levels of those ganged channel strips a bit (just make sure you don't make its contribution overly lopsided in the stereo output), or make some other change between these two channel strips, such as a subtle stereo delay or verb which is different on each side, or a complementary EQ which alternately boosts one side where the other side is cut, simple to do on a graphic by alternating sliders slightly in opposite ways for each side up and down the spectrum).  Whatever difference you impose between the original and the polarity inverted copy won't cancel out in the mono sum.  Bigger difference = more of it in the mono mix.  No difference with perfectly matched levels = none of it in the mono mix.
musical volition > vibrations > voltages > numeric values > voltages > vibrations> virtual teleportation time-machine experience
Better recording made easy - >>Improved PAS table<< | Made excellent- >>click here to download the Oddball Microphone Technique illustrated PDF booklet<< (note: This is a 1st draft, now several years old and in need of revision!  Stay tuned)

Offline thatjackelliott

  • Trade Count: (0)
  • Taperssection Regular
  • **
  • Posts: 77
Re: Oddball microphone techniques
« Reply #298 on: October 27, 2017, 10:30:49 AM »
Got it (echo echo echo from the bottom of the rabbit hole*). The split/inverted rear mic signal nulls out if summed 1:1, so imbalancing it will let some rear mic bleed into the mono mix. This can be used to fade the audience during soft songs, and bring them back in for applause. Me very likee. What mic pattern for the rear? I have cards and subcards. Stage lip setup. Probably to help reject the PA stacks I'll try a card.

I monitor live with headphones. They are noise-canceling, which is helpful when trying to listen to the mix, but they are headphones and when it comes to stereo spread and imaging, I prefer speakers. All I can do the first time I try this is to make a guess about the right amount of decorrelated rear/audience/room to add to the main mix. However, I will be recording the mics separately for later mixdown, so after the festival when I get a balance that I like on the speakers, I will see what the mix looks like on a goniometer/vectorscope plugin and use that as a rough guide for the next live broadcast.

This stuff is fun.

* Or is this the bottom? Deeper layers of mic geekery?

Offline Gutbucket

  • record > listen > revise technique
  • Trade Count: (15)
  • Needs to get out more...
  • *****
  • Posts: 15683
  • Gender: Male
  • "Better to love music than respect it" ~Stravinsky
Re: Oddball microphone techniques
« Reply #299 on: October 27, 2017, 10:48:09 AM »
Wonderland is bottomless AFAIK. Avoid tousles with the red queen.

Yeah, you'll want to try and reduce pickup of the PA and stage in that mic as much as possible.  An audience facing cardioid is probably the ticket.
musical volition > vibrations > voltages > numeric values > voltages > vibrations> virtual teleportation time-machine experience
Better recording made easy - >>Improved PAS table<< | Made excellent- >>click here to download the Oddball Microphone Technique illustrated PDF booklet<< (note: This is a 1st draft, now several years old and in need of revision!  Stay tuned)


RSS | Mobile
Page created in 0.083 seconds with 39 queries.
© 2002-2024 Taperssection.com
Powered by SMF